IP Manager Assistant Proxy Mode Explained
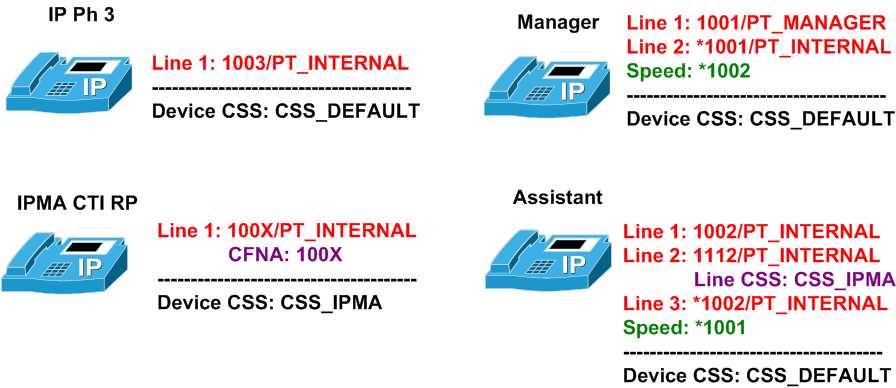
IPMA is yet another well-known CCM application that you may encounter on your CCIE Voice lab exam. While IPMA Proxy mode is clearly a legacy approach to configure this application its still a topic you could see in the lab. Before we discuss the configuration steps, let’s take a quick overview of a simplified model for IPMA Proxy mode operations. Refer to the diagram for IP Phone extension numbers.

The whole purpose of IPMA proxy is to intercept calls going directly to manager’s IP Phone primary line (“1001”), and proceed them using IPMA configurable call routing logic – usually divert calls to the assistant’s so-called Proxy line (“1112”). In other words, calls placed to manager phone, gets re-routed to assistant’s “proxy” line. Of course, manager has some control of the call-routing logic from it’s IP Phone, using special set of softkeys (plus a Web-interface for advanced configurations).
Now the whole idea of Proxy mode is to put the IPMA application in the call routing path between a caller and the manager’s primary extension. To accomplish this goal, manager’s primary line should be isolated into a separate partition – let’s call it PT_MANAGER. No other IP Phone in the system should have direct access to this partition – their respective CSSes should not contain this partition. Let’s name the CSS used by all IP Phones in the system as CSS_DEFAULT.
Now recall that IPMA is a Java application running in Cisco Tomcat server. IPMA uses CTI interface to control various call-routing components in the CallManager. Specifically, a CTI Route Point should be created in the CallManager system, and IPMA application should take control of it. Next, a “wildcard” extension “100X” should be associated with the CTI RP line and placed in partition PT_INTERNAL - the default partition used for all IP Phone lines within the system (Well, the DocCD recommends using a separate partition for the CTI RP – and indeed, this is a more flexible approach. However, for the sake of the configuration speed, it makes sense to use the minimum set of partitions). The “wildcard” extension number is actually used in configurations where many managers with the primary extension numbers in range “100X” should be covered with the IPMA application. If you are providing call coverage for just one manager’s phone, you can use “1001” here. Also, you may want to set the CFNA number to “100X” or “1001” – this will provide call routing backup in a case when IPMA application would happen to fail.
With the above configuration, when any phone in the system calls “1001” – the manager’s primary line, the call gets routed to “100X/PT_INTERNAL”, and eventually hits the IPMA application. At this point, the IPMA application may want to direct the call to the manager’s real line – “1001/PT_MANAGER” – and this is why the CTI RP should have a special CSS assigned, which has access to PT_MANAGER partition. Let’s name this CSS as CSS_IPMA. As a minimum, CSS_IPMA should contain PT_MANAGER and PT_INTERNAL – since the IPMA may need to redirect call to some other internal extension. (Note that “1001/PT_MANAGER” precedes “100X/PT_INTERNAL” when using CSS_IPMA. This order resolves the ambiguity, even in case when one assigns number “1001” to CTI RP).
To complete the picture, recall the proxy line on assistant’s phone. This is where IPMA application direct calls to by default. Since the assistant may need to direct the call back to manager’s phone, this proxy line should be configured to use CSS_IPMA as the Line CSS. With this setup, the proxy number “1112” is placed in PT_INTERNAL partition (so the CTI RP can reach it) and is allowed to call the manager’s primary line directly. Of course, the primary line of assistant’s phone (“1002”) has no special Line CSS configured, and will therefore hit the IPMA application when calling “1001”.
Per the recommended design, you should also create two intercom lines on both manager’s and assistant’s IP Phones. An intercom is simple a line, which has auto-answer with speakerphone turned on. On the opposite side, you just add a speed dial to reach the intercom number. Thus, you need to intercom lines plus two speed dials to accomplish the intercom configuration.
Now let’s move to the actual configuration. While CallManager has a special built-in IPMA Wizard, personally I’d prefer not to mess with it - unless you’re absolutely sure about what you are doing – the wizard will modify your partitions and CSSes, and may do that in the way you don’t expect. Configuring IPMA proxy mode manually takes a little more time, but once you understand it completely, it won’t take that much. Plus, you get full control of your configuration. So it’s a good idea to create your own IPMA configuration checklist, and use it during your practice. Here is how a checklist may look like.
[Call Intercept]
1) Create Partitions & CSSes: PT_MANAGER & CSS_IPMA
2) Create CTI RP, assign extension number “100X/PT_INTERNAL” to it, set CSS_IPMA as the device CSS. You may also use “1001” extension to cover just one manger
2.1) Set CFNA to “100X” or to “1001” if you provide call coverage for just one manager. This will provide call backup if the IPMA application fails.
[IP Phones]
1) Create a new Button Template, say “3+3 7960” to allow more than two lines on an IP Phone. You will need this template for assistant’s phone, to accommodate three lines: primary, proxy and intercom.
2) Configure the Manager’s Phone
2.1) Set Softkey template to “Standard IPMA Manager”
2.2) Configure the primary line in “PT_MANAGER”
2.3) Add an intercom line, “*1001” and a speed-dial to “*1002” to reach the assistant
2.4) Create IPMA IP Phone service & subscribe the IP Phone to it (URL could be found on DocCD)
3) Configure the Assistant’s Phone
3.1) Set Softkey template to “Standard IPMA Assisant”
3.2) Set Button Template to “3+3 7960” (assistant needs extra lines)
3.2) Add a proxy line “1112/PT_INTERNAL” and set the Line CSS to “CSS_IPMA” for this line
3.3) Add an intercom line, “*1002” and a speed-dial to “*1001” to reach the assistant
[Users]
1) Create a new user named “manager”
1.1) Allow it the use of CTI Application & CTI Super Provider
1.2) Associate this user with manager’s IP Phone
2) Create a new user named “assistant”
2.1) Allow it the use of CTI Application & CTI Super Provider
2.2) Associate this user with assistant’s IP Phone
3) Get back to “manager” user
3.1) Start the Cisco IPMA configuration dialog and disable automatic configuration
3.2) Configure the settings per your setup
3.3) Add a new assistant to the manager
3.4) Configure the assistant, matching proper primary manager’s line against the assistant’s proxy line
[IPMA Application]
1) Choose Service Parameters for Cisco IPMA Application
2) Configure CTI Manager IP Addresses (primary/backup). In simplest case just use your Publisher IP
3) Configure IPMA Application IP Addresses (primary/backup). In simplest case just use your Publisher IP
4) Set the CTI RP name for the IPMA application
5) Restart the Cisco Tomcat Windows Service or go to Tomcat manager interface at http://[IPMA server IP Address]/manager/list and restart the service there
[Verification]
1) Check that manager’s phone has IPMA softkey set on it’s screen
2) Install the Cisco IPMA Console Application and log in there as “assistant”
3) Place a call to manager’s primary line, ensure it get’s routed to the assistant phone, and pick it up from the IPMA console. Forward the call back to manager’s primary line
4) Configure from the manager’s phone to accept all calls and place a call to manager’s primary line once again
Making checklists for complex tasks is a must when preparing to CCIE Voice lab. The above list suggests a simplified manual approach to configure all IPMA application settings, in the order specifically optimized for speed. However, if you are pretty much comfortable with the IPMA Wizard, you can use it for your setup. Just make sure you performed a thorough verification after that.
The final note is about interaction of IPMA proxy mode with the voicemail system. Since we isolate the manager’s primary line in separate partition, we need to make sure MWI CSS is able to access it, in order to light the MWI lamp. Make sure you wont forget about it, since this may cost you some precious points.
Further reading:
