IP Routing on the PIX/ASA
This post was created using GNS3 and follows what I thought was some of the most lab and real-world relevant content from the Cisco ASA documentation in the area of IP Routing:
http://www.cisco.com/en/US/docs/security/asa/asa72/configuration/guide/ip.html
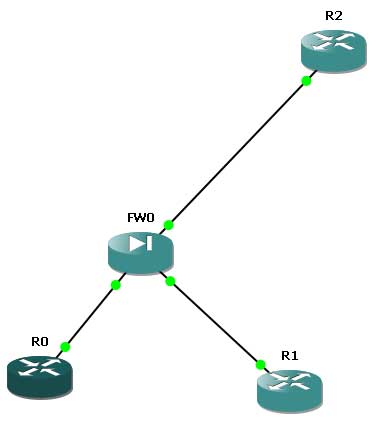
Here is the topology used:

Initial Setup
First, we place the necessary IP configurations on the devices for our initial connectivity:
R0:

en

conf t

host R0

line con 0

exec-time 0 0

logg synch

!

int fa0/0

no shut

ip address 192.168.1.100 255.255.255.0

end
R1:

en

conf t

host R1

line con 0

exec-time 0 0

logg synch

int fa0/0

no shut

ip address 10.10.10.100 255.255.255.0

!

interface loopback 20

ip address 10.10.20.100 255.255.255.0

end
R2:

en

conf t

host R2

line con 0

exec-time 0 0

logg synch

int fa0/0

no shut

ip address 172.16.1.100 255.255.255.0

end
FW0:

en

conf t

host FW0

!

int e0

ip address 192.168.1.1 255.255.255.0

nameif outside

no shut

!

int e1

ip address 10.10.10.1 255.255.255.0

nameif inside

no shut

!

int e2

ip address 172.16.1.1 255.255.255.0

nameif DMZ

security-level 50

no shut

!

end
At this point, I will be sure to ping each connected router from the PIX to ensure IP connectivity. Remember, by default you can ping from the PIX and to the PIX, but you cannot ping through the PIX.
Static Routing
First, I will create a simple static route to the "remote" loopback network that I have created on R1. Notice that to create a static route we simply use the route command, followed by the interface name, then the network and mask, and finally the next hop. Notice how similar this is to the syntax for a static route on a router, although one major difference is the command does not begin with ip.
FW0:

conf t

route inside 10.10.20.0 255.255.255.0 10.10.10.100

end
Verification of this static route can be accomplished with a show route and a ping of the remote destination address 10.10.20.100.
Default Static Routing
In order to configure a default static route, use the route command but with an all 0's network prefix and mask. The PIX/ASA allow a shortcut of 0 and 0 to represent 0.0.0.0 and 0.0.0.0. Here I configure a default static route pointing to our outside router.
FW0:

conf t

route outside 0 0 192.168.1.100

end
Verification for this configuration is a quick show route. The PIX/ASA should now show a gateway of last resort and the static route should be marked as a candidate default.
Static Route Tracking
An issue with the static route we just configured is the fact that if the destination gateway of last resort is down, the route is not removed from the routing table. This issue can be circumvented with the static route tracking capability.
First, I use the Cisco IOS IP Service Level Agreements (SLAs) monitor feature to track the availability of the gateway. This is done with the following commands:
FW0:

conf t

sla monitor 1

type echo protocol ipIcmpEcho 192.168.1.100 interface outside

exit

sla monitor schedule 1 life forever start-time now

end
Notice these commands instruct the SLA monitor to ping the gateway starting now and to do this forever. I picked an SLA_ID of 1 to bind these commands together.
Next, I will associate a tracked static route with the SLA monitoring process using the following commands. Notice here that I have used a Track_ID of 20 and I have recreated our default static route so that it includes the Track_ID. Notice also here that the track command is tied to the SLA monitor with the SLA_ID of 1.
FW0:

conf t

track 20 rtr 1 reachability

route outside 0 0 192.168.1.100 track 20

end
A nifty verification at this point is to move to R0 (the gateway of last resort) and run debug ip icmp. You will find that this router is being pinged every minute by the firewall now as a reachability test.
Next, I create a backup default static route. This is simply another default static route entry that possesses a higher administrative distance than the original static default route:
FW0:

conf t

route outside 0 0 192.168.1.55 22
For verification, you can shut the interface on the default gateway and run a show route on the PIX/ASA to ensure the backup is installed.
Dynamic Routing - OSPF
Now it is time to tackle a dynamic routing protocol configuration. Here I configure an MD5 authenticated neighborship between R2 and FW0. Notice that the network command on the PIX/ASA requires a subnet mask as opposed to a wildcard mask.
R2:

conf t

router ospf 1

network 172.16.1.100 0.0.0.0 area 0

!

interface fastethernet 0/0

ip ospf authentication message-digest

ip ospf message-digest-key 1 md5 cisco

!

end
FW0:

conf t

router ospf 1

network 172.16.1.1 255.255.255.255 area 0

!

interface e2

ospf authentication message-digest

ospf message-digest-key 1 md5 cisco

!

end
For verification, simply run show ospf neighbor on FW0.
Dynamic Routing - RIP version 2
Next, we will run RIP version 2 on the PIX/ASA and advertise the DMZ subnet to the internal router R1. Here are the configurations:
R1:

conf t

router rip

version 2

no auto-summary

passive-interface default

network 10.0.0.0

no passive-interface fa0/0

end
FW0:

conf t

router rip

version 2

no auto-summary

network 172.16.0.0

network 10.0.0.0

end
Verification for RIP in this example would include show ip route on R1 and debug rip on FW0.
Conclusion
I certainly hope you have enjoyed this blog on IP routing with the PIX/ASA. While my goal was to hit the highlights, please keep in mind the fact that there are many features of the dynamic routing protocols that are available and not covered here. In fact, there are even some static routing features that were omitted in this discussion. Just remember that these features should be very easy to find in the documentation link when you are in the heat of battle.
