Using GNS3 to Help Master the PIX/ASA – Basic Setup and the First Emulation
Hello all. I have had some peers ask me for help in getting up and running quickly with GNS3 to help master the PIX/ASA.
Here is my step-by-step on that.
I am installing on the following system:
-
Alienware
-
Windows Vista Home Premium
-
AMD Athlon 64 X2 Dual Core Processor 5600+ 2.80 GHz
-
4 GB RAM
Notice I am running Vista (sigh). There is a lot of misinformation out there about GNS3 not working with Vista. This is not true, as you will read below.
I head up to www.gns3.net and download the WIN32-all-in-one EXE file available from the Download area. I run this EXE and proceed with the install. This is a “spousal” installation, just say YES (next) to everything the install wizard has to ask you. :-)
In order to get ready to run my first emulations, I have created a folder called c:\Cisco Images and I have placed the following images there c3725-advsecurityk9-mz.124-15.T7.bin, pix723.bin, and pix724.bin. I should mention that for all of this I want to be logged in as a Vista Administrator.
I now launch GNS3 and perform the following:
Step 1: In the Setup Wizard dialog click the large 1 button.

Step 2: Click the Dynamips option in the left pane and click the Test button on the Dynamips tab to ensure that Dynamips can be found successfully.
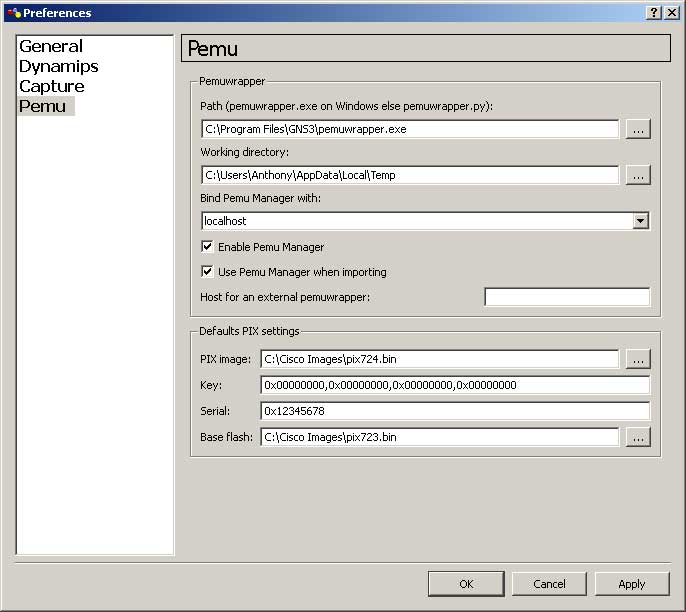
Step 3: Click Pemu in the left pane and in the Defaults PIX settings area, click the …button and select your PIX image from your Cisco Images folder. In my case, this results in C:\Cisco Images\pix724.bin.
Step 4: Click the … button for Base Flash: and select your base flash image. In my case, this results in C:\Cisco Images\pix723.bin.

Step 5: Click OK in the Preferences dialog.
Step 6: Click the large 2 button.
Step 7: Under the Settings area, click the … button and choose your IOS image file from your Cisco Images folder.
Step 8: Choose Save and then Close from the IOS images and hypervisors dialog.
Step 9: Click OK in the Setup Wizard.
Step 10: In GNS3, drag your router model from the Nodes Type pane into the main topology pane. Right-click the router (R0) and choose Start.
Step 11: Right-click the router and choose Idle PC. Click OK in the IDLE PC dialog. Click OK in the next IDLE PC dialog.
Step 12: Drag the PIX firewall from the Nodes Type pane into the main topology pane. Right-click the firewall (FW0) and choose Start. NOTE: If your firewall fails to start with an error 209, it might be a Vista permissions issue. Close everything down. Right-click the file C:\Program Files\GNS3\pemuwrapper.exe and choose Run As Administrator. Then from the Start Menu, right-click GNS3 and choose Run As Administrator. You should be fine now.
Step 13: From the GNS3 toolbar, choose the Add a Link button. Click Manual. Click R0 and choose an interface and then click FW0 and choose an interface.
Step 14: You are now ready to configure your devices and start having some fun! Hover your mouse over a device you want to configure and notice the port number. Use your favorite terminal program (Terra Term, CRT, HyperTerminal) and connect to Localhost and that port number you just found.
Happy Emulating!
