Transparent Firewall - Things That Go Bump on the Wire!
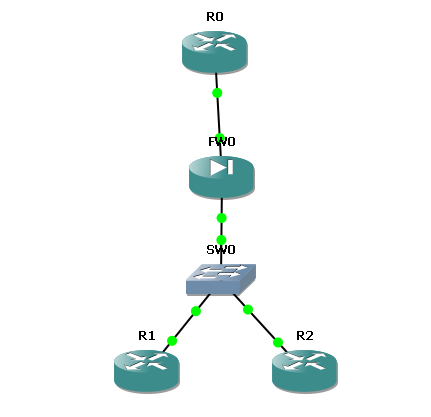
This blog will examine the basic setup of the transparent firewall feature available with the PIX and the ASA. This blog was based on the PIX-525 running 7.2(4) code with a Restricted license in GNS3. Here is the topology that was used:
![]()
Remember, that a transparent firewall resides WITHIN a subnet and is easy to implement in an existing network where re-addressing to introduce a firewall might be difficult. This configuration is sometimes known as a "stealth" firewall or a "bump on the wire". Thanks to the fact that the firewall lives within the subnet, instead of between it, the device has the ability to filter traffic between hosts within the subnet. Note that the traditional Layer 3 firewall can only filter traffic moving between subnets. This should remind you of the difference between a VLAN Access Control List versus a Router-based Access Control List.
Well, with the introductions out of the way, let's do what we love best, let's get to the command line.
The first thing I will do is configure and verify the transparent firewall feature and then name our PIX:
pixfirewall> en

Password:

pixfirewall# conf t

pixfirewall(config)#  firewall transparent

pixfirewall(config)# show firewall

Firewall mode: Transparent

pixfirewall(config)# hostname LAYER2FIREWALL

LAYER2FIREWALL(config)#
Excellent, now that the firewall is in transparent mode, let's take care of the inside and outside interfaces. When in transparent mode, you are limited to the use of two interfaces for passing traffic. Notice how the interfaces are not configured with IP addresses.
LAYER2FIREWALL(config)# int e1

LAYER2FIREWALL(config-if)# nameif inside

INFO: Security level for "inside" set to 100 by default.

LAYER2FIREWALL(config-if)# no shut

LAYER2FIREWALL(config-if)# exit

LAYER2FIREWALL(config)# int e0

LAYER2FIREWALL(config-if)# nameif outside

INFO: Security level for "outside" set to 0 by default.

LAYER2FIREWALL(config-if)# no shut

LAYER2FIREWALL(config-if)# sh int ip brief

Interface                  IP-Address      OK? Method Status                Protocol

Ethernet0                  unassigned      YES unset  up                    up

Ethernet1                  unassigned      YES unset  up                    up

Ethernet2                  unassigned      YES unset  administratively down up

Ethernet3                  unassigned      YES unset  administratively down up

Ethernet4                  unassigned      YES unset  administratively down up
I am sure this output looks a little strange for those of you that have not played with this feature. Just as unusual is the fact that all of the interfaces facing this device are addressed in the 10.0.0.0/24 subnet.
A requirement of the transparent firewall is that it must have an IP address assigned in global configuration mode for management access. Notice for verification we can see that our traffic forwarding interfaces are now "listening" on that IP address:
LAYER2FIREWALL(config)# ip address 10.0.0.22 255.255.255.0

LAYER2FIREWALL(config)# sh int ip brief

Interface                  IP-Address      OK? Method Status                Protocol

Ethernet0                  10.0.0.22       YES unset  up                    up

Ethernet1                  10.0.0.22       YES unset  up                    up

Ethernet2                  unassigned      YES unset  administratively down up

Ethernet3                  unassigned      YES unset  administratively down up

Ethernet4                  unassigned      YES unset  administratively down up
Let us now test the "out of the box" functionality of the security device. I will initiate a Telnet session from the Inside interface to a device located on the Outside interface. This communication should be permitted due to the Adaptive Security Algorithm and the default security levels on our interfaces. Notice how we can easily verify the connection of the appliance.
R1#telnet 10.0.0.10

Trying 10.0.0.10 ... Open

User Access Verification

Password:

R0>

LAYER2FIREWALL(config)# show conn

1 in use, 1 most used

TCP outside 10.0.0.10:23 inside 10.0.0.1:25501, idle 0:00:03, bytes 102, flags UIO
Let's now permit Telnet connections from our management workstation (played by R2) and ensure we have connectivity to the PIX.
LAYER2FIREWALL(config)# telnet 10.0.0.20 255.255.255.255 Inside
R2#telnet 10.0.0.22

Trying 10.0.0.22 ... Open

User Access Verification

Password:

Type help or '?' for a list of available commands.

LAYER2FIREWALL>
Well, I am sure I will blog more on this Layer 2 firewall at a later point, but I sure do thank you for stopping by to read this initial post.
