Configuring a PSTN dialplan
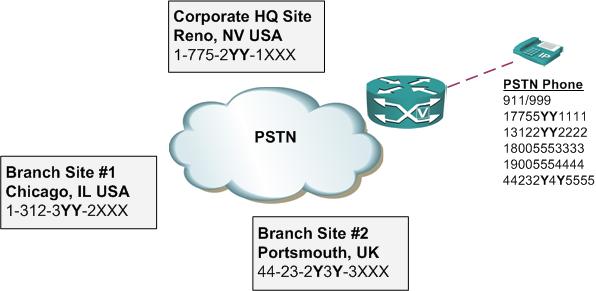
In this post we are going to describe a sample dialplan that could be used with PSTN simulator in your voice lab. Let’s start by looking at the following diagram to get basic understanding of the lab topology. In the diagram YY stands for two-digit rack number, for example 01 and 02 for racks 1 and 2, and Y is the last digit of the rack number for example 1 and 2 for racks 11 and 12.

There are three sites: HQ and BR1 are in the US and BR2 is in the UK. The PSTN router simulates a PSTN cloud with three ISDN connections. Note the dialing patterns on the diagram. The next thing to figure out is how various types of dialing patters are signaled to the PSTN are. In our case, the agreement is as follows:
- Local area PSTN calls are placed to 7-digit numbers at the HQ and BR1 locations, and to 8-digit numbers at BR2 location.
- Long-distance (national) calls at the HQ and BR1 are placed to 10-digit numbers using code “1” for toll-alert
- Long-distance calls at BR2 are placed to 10 digit numbers at BR2 using code “0” for toll-alert.
- International calls at the HQ and BR1 sites are signaled using access code “011” along with the variable length number.
- International calls at BR2 are placed using toll-alert code “00” and variable length number.
The above requirements provide quite a mix of different dialing patterns. What we are going to do, is configure dial-peers for full E.164 patterns corresponding to each site first, and then use translation rules to handle other types of dialing patterns, by expanding them to full E.164 numbers. Here is the configuration for E.164 numbers:
!

! Voice ports to BR1

!

voice-port 0/0/0:23
!
! Voice port to BR2
!
voice-port 0/1/0:15
!
! Voice port to HQ
!
voice-port 0/3/0:23
!
! Handle DID
!
dial-peer voice 1 pots
incoming called-number .
direct-inward-dial
!
! BR1 E.164
!
dial-peer voice 100 pots
description == BR1 3123YYXXXX
destination-pattern ^13123YY....
port 0/0/0:23
forward-digits 10
!
! BR2 E.164
!
dial-peer voice 200 pots
description == BR2 232Y3YXXXX
destination-pattern ^44232Y3Y....
port 0/1/0:15
forward-digits 8
!
! HQ E.164
!
dial-peer voice 300 pots
description == HQ 7752YYXXXX
destination-pattern ^17752YY....
port 0/3/0:23
forward-digits 10
Note that every pattern is unique thanks to E.164 number structure (country-code, area-code etc). Note that the PSTN router forwards 10 digits to HQ and BR1 endpoints while only 8 digits are forwarded over BR2 connection. Next we need to design the translation rules to transform various types of dialing (local, long-distance, international) to E.164 patterns. For example, look at the translation rule for BR1 site.
voice translation-rule 10

 rule 1 /^1[2-9]..[2-9]....../ /\0/

 rule 2 /^011\(.*\)/ /\1/

 rule 3 /^[2-9]....../ /1312\0/
The first rule handles long-distance numbers 1-[2-9XX-[2-9]XXXXXX by simply leaving them unmodified. This maps every LD number directly to the respective E.164 pattern (HQ or BR1). Next, rule 2 handles international dialing (011 + variable string) by stripping the prefix “011” and sending the remaining E.164 number along. The last rule handles local dialing ([2-9]XX-XXXX) (dialing within BR1 area by prepending the country and area code corresponding to this location). Now look at the complete set of translation rules – note that we apply the rules directly to the respective voice-ports.
!

! BR1 translation rule

!

voice translation-rule 10

 rule 1 /^1[2-9]..[2-9]....../ /\0/

 rule 2 /^011\(.*\)/ /\1/

 rule 3 /^[2-9]....../ /1312\0/
!
! BR2 translation rule
!
voice translation-rule 20
rule 1 /^0\([1-8].........\)/ /44\1/
rule 2 /^00\(.*\)/ /\1/
rule 3 /^[1-8]......./ /4423\0/
!
! HQ translation rule
!
voice translation-rule 30
rule 1 /^1[2-9]..[2-9]....../ /\0/
rule 2 /^011\(.*\)/ /\1/
rule 3 /^[2-9]....../ /1775\0/
!
! Create voice translation profiles
!
voice translation-profile FROM_BR1
translate called 10
!
voice translation-profile FROM_BR2
translate called 20
!
voice translation-profile FROM_HQ
translate called 30
!
! Apply the voice translation profiles to the voice ports
!
voice-port 0/0/0:23
translation-profile incoming FROM_BR1
!
voice-port 0/1/0:15
translation-profile incoming FROM_BR2
!
voice-port 0/3/0:23
translation-profile incoming FROM_HQ
Now the final part of the PSTN router configuration – the PSTN phone. First, look at the older post which demonstrates how a PSTN router could be configured to simulate a PSTN phone using the RTP loopback feature:
Using RTP Loopback for PSTN Call Testing
However, most people prefer to register a softphone (or a hardware phone) with the PSTN router and use it to place test calls. Here is how you could do this easily. First, configure the router as CME system and allow ephones registration. Then, create ephone-dns corresponding to the patterns specified on the diagram demonstrated before. Finally, create a ephone and set its MAC-address to a value matching your setup. Note that thanks to the translation rules, you can always dial the PSTN phone numbers using their "local" (7 digits) or national (10 digits) variants.
interface Loopback0

 ip address 177.Y.254.254 255.255.255.255

!

! CME configuration

!

telephony-service

 max-ephones 10

 max-dn 20

 ip source-address 177.Y.254.254 port 2000

 create cnf-files

 max-conferences 8 gain -6

!

! Ephone-DNs

!

ephone-dn  1

 number 911 secondary 999

 description PSTN Phone

 name PSTN Phone

!

!

ephone-dn  2

 number 5YY1111 secondary 17755YY1111

!

!

ephone-dn  3

 number 2YY2222 secondary 13122YY2222

!

!

ephone-dn  4

 number 232Y3Y3333 secondary 01144232Y3Y3333

!

!

ephone-dn  5

 number 13105551234

!

!

ephone-dn  6

 number 19005550001

!

!

ephone-dn  7

 number 411 secondary 611

!

!

ephone  1

 mac-address 000C.294C.F1D4

 button  1:1 2:2 3:3 4:4 5:5 6o6,7
This final part of code completes the configuration of the PSTN router.
