Understanding Flexible Packet Matching
Flexible Packet Matching is a new feature that allows for granular packet inspection in Cisco IOS routers. Using FPM you can match any string, byte or even bit at any position in the IP (or theoretically non-IP) packet. This may greatly aid in identifying and blocking network attacks using static patterns found in the attack traffic. This feature has some limitation though.
a) First, it is completely stateless, e.g. does not track the state/history of the packet flow. Thus, FPM cannot discover dynamic protocol ports such as use by H.323 or FTP nor cannot it detect patterns split across multiple packets. Essentially, you are allowed to apply inspection per-packet basis only.
b) Additionally, you cannot apply FPM to the control-plane traffic, as the feature is implemented purely in CEF switching layer. Fragmented traffic is not assembled for matching, and the only inspected packet is the initial fragment of the IP packet flow.
c) IP packets with IP options are not matched by FPM as well, because they are punted to the route processor.
d) Lastly, this feature inspects only unicast packets and does not apply to MPLS encapsulated packets.
Configuring an FPM filter consists of a few steps.
(1) Loading protocol headers.
(2) Defining a protocol stack.
(3) Defining a traffic filter.
(4) Applying the policy & Verifying
Let’s look at every of these steps in depth.
Loading a PHDF (optional). PHDF stands for Packet Header Definition file. Those files use XML syntax and define the structure of various packet headers, such as Ethernet, IP, TCP, UDP and so on. They are very helpful in making filtering more structured, as with the PHDFs loaded you may filter based on the header field names and their values, instead of matching fixed offsets in the unstructured packet body. You may load the files into the router’s memory using the command load protocol
Defining a protocol stack (optional). This step uses the PDHFs loaded previously and allows specifying the protocol headers found in the traffic you want to inspect. Using the protocol stack definition induces structure in the packets being inspected. This allows for filtering based on header field values and specifying offsets in the packet relative to the header fields. Additionally, you may define various protocol stacks (e.g. UDP in IP, UDP in GRE in IP) and reuse the same access control policy with various stacks.
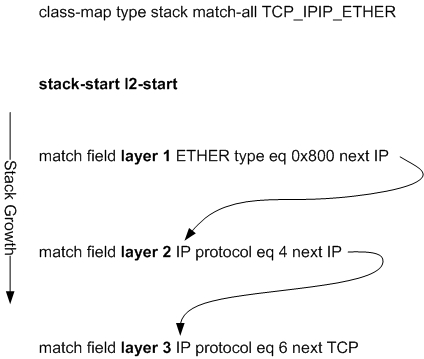
You define the protocol stack using the command class-map type-stack match-all <NAME>. This class-map it is always of type “match-all” and consists of a series of the match entries. Every match entry should specify a protocol name defined in loaded PHDFs, a header field value and the next protocol name found in stack. Look at the sample below – it defines the series of headers: TCP in IPIP tunnel headed (protocol 4) encapsulated in IP and in the Ethernet.

The order of the match statements is important – it defines the actual header stacking along with the “layer x” keywords. The layers are counted bottom up starting at the stack bottom and “layer 1” is the default. The other important thing is that every next match statement should define the protocol specified in the next clause of the previous match statement. This is a basic consistency check illustrated using the arrows in the diagram. Notice that most of the times you could just use a single-protocol stack, as you commonly deal with TCP or UDP protocols encapsulated in IP headers.
Now a few words about the match operator. This command uses the syntax match field <PROTO> <header-field> <operator> <value> . It is important to stress that the protocol and header fields are learned dynamically from PHDFS and this allows for high configuration flexibility. The operator could be “eq”, “neq”, “range”, “string”, “regex”, “lt” and “gt”. The operator names are self-explanatory, but the “eq” operator also supports a special “mask” parameter. The mask is interpreted as a bitmap, where “1” means the corresponding bit in the value could be any of “0” or “1” and “0” means the respective bit is “locked”.
By default, the protocol stack is matched stating AFTER the data-link level header. That is, the first header defined in the stack is match against the header going after the L2 header. In real life, this is commonly the IP header. However, sometime you may want to match the layer2 header fields as well, e.g. Ethernet addresses. To make the protocol stack match starting at L2 level, use the command stack-start l2-start.
At this point, having just stack class-maps you may already apply traffic filtering to the packets matching the configured stack. To accomplish this, create a policy-map of type “access-control” and assign a stack class to the policy-map. For example:
class-map type stack TCP_IN_IP_IN_ETHER

 statck-start l2-start

 match field ETHER type eq 0x800 next IP

 match field layer 2 IP protocol eq 0x6 next TCP

!

policy-map type access-control DROP_TCP_IN_IP_IN_ETHER

 class TCP_IN_IP_IN_ETHER

   drop
There is basically just a a couple of actions available with the access-control policy-maps: drop and log. You may also use the send-response command under a class to make the router send an ICMP unreachable response.
Of course, using just stack class-maps might be inflexible, as you cannot match the packets payload. You may however use this for filtering based on addresses, protocol flags and so on.
Defining a traffic filter. Traffic filter is defined by means of special class-map of type “access-control” and configuring a respective policy-map of the same type. Using this type of class-maps you can match the protocol field values using the command match field <PROTO> if the respective protocol’s PHDF has been loaded. If you match the protocol fields, then the policy-map using the newly defined access-control class-map must be nested under the stack-type class-map defining this protocol. We’ll see an example later.
In addition to matching the protocol header fields, you can match the packet payload at a fixed offset against a pre-defined value, value range, string or regular expression. You may base the offset off the defined protocol header field (e.g. +10 bytes from TCP flags) using the command match start <PROTO> <FIELD-NAME> offset <OFFSET> size <SIZE>. For example:
match start TCP checksum offset 100 size 1 ...

match start IP version offset 0 size 1 ...
Of course, this type of offset “basing” is only possible if the respective protocol definition has been loaded and the containing stack-type class map has this protocol defined.
Irrespective of the protocols loaded/defined, you may base the offset from the L2 or L3 packet starts (absolute offsets). For example if the packet is IP in Ethernet, than L2-start is the first bit of the Ethernet header and L3-start is the first bit of the IP header. The command syntax is match start {l2-start|l3-start} offset <OFFSET-BYTES> size <SIZE-BYTES> <operator> <value>. The command specifies the offset in bytes from the selected start. If the size if less than or equal to 4 bytes, you can use the “eq, neq, lt, gt” operators in addition to “regex” and “string”. This allows for per-bit matching using the “eq” and “mask” operators combination. For example:
match start l3-start offset 0 size 1 eq 0x2 mask 0x3

match start l2-start offset 36 size 5 string ABCDE
Creating an access-control policy-map. You have two options here. You may create a simple access-control policy-map, which has just the basic access-control assigned, without nesting. For example:
class-map type access-control PASSWORD

 match start l3-start offset 0 size 100 regex ”.*[pP][aA][sS][wW].* ”

!

policy-map type access-control DROP_PASSWORD

 class PASSWORD

  drop
When using this simple non-nested syntax, you may only use the absolute offsets with the command match {l2-start|l3-start} and cannot reference any protocol header fields.
You may use a more flexible approach, by nesting the filtering policy under a stack-type class-map configured in containing policy-map. This allows for using protocol headers in filtering policy or basing the offsets from the packet header fields. Notice that the nested filtering policy may only use the protocol headers defined in the containing stack class-map. Here is an example that looks for string “TEST” in TCP packets:
class-map type stack TCP_IN_IP
match field IP protocol eq 0x6 next TCP!
! Protocol fields matched in the filtering policy
! must be for the protocols defined in the stack
! class-map
!
class-map type access-control match-any FILTER_CLASS
match start TCP payload offset 0 size 4 string TEST
!
policy-map type access-control FILTER_POLICY
class FILTER_CLASS
drop
!
policy-map type access-control STACK_POLICY
class TCP_IN_IP
service-policy FILTER_POLICY
Applying the traffic filtering policy. Finally, the access-control policy map should be applied to an interface either inbound or outbound using the interface-level command service-policy type access-control {input|output} <NAME>. This could be a simple non-nested policy using just stack-type class-maps or access-control class-maps or more advanced, stack and nested access-control policy-map.
And now, let’s look at a sample task. We would like to filter ICMP echo packets with the stings “AAAA” inside them, encapsulated inside IPIP tunnel. Here is the diagram for the testbed scenario:

And now, the configuration to be applied to R6's Fa0/0:
load protocol system:fpm/phdf/ip.phdf
load protocol system:fpm/phdf/icmp.phdf
load protocol system:fpm/phdf/ether.phdf!
! Three protocols in stack: Ether/IP/IP
!
class-map type stack match-all ICMP_IN_IPIP_IN_ETHER
stack-start l2-start
match field ETHER type eq 0x800 next IP
match field layer 2 IP protocol eq 4 next IP
match field layer 3 IP protocol eq 0 mask 0xFF next ICMP!
! Access-Control Policy, matches on the ICMP payload
!
class-map type access-control match-all ICMP_ECHO_STRING_AAAA
match field ICMP type eq 8
match start ICMP payload-start offset 0 size 256 regex ".*[aA][aA][aA][aA].*"!
! Access-Control Policy-Map
!
policy-map type access-control LOG_ICMP_ECHO
class ICMP_ECHO_STRING_AAAA
log!
! Outer policy map, matches the protocol stack.
!
policy-map type access-control STACK_POLICY
class ICMP_IN_IPIP_IN_ETHER
service-policy LOG_ICMP_ECHO
Next, a basic verification of our configuration. We send ICMP packets loaded with AAA characters (ASCII code 0x41) from SW1 to SW2 and see if they match the policy-map in R6:
Rack1SW1#ping 192.168.0.8 data 4141Type escape sequence to abort.
Sending 5, 100-byte ICMP Echos to 192.168.0.8, timeout is 2 seconds:
Packet has data pattern 0x4141
!!!!!
Success rate is 100 percent (5/5), round-trip min/avg/max = 1/3/4 ms
Rack1SW1#
SCRack9AS>6
[Resuming connection 6 to R6 ... ]Rack1R6#show policy-map type access-control interface fastEthernet 0/0
FastEthernet0/0Service-policy access-control input: STACK_POLICY
Class-map: ICMP_IN_IPIP_IN_ETHER (match-all)
5 packets, 670 bytes
5 minute offered rate 0 bps
Match: field ETHER type eq 0x800 next IP
Match: field layer 2 IP protocol eq 4 next IP
Match: field layer 3 IP protocol eq 0 mask 0xFF next ICMPService-policy access-control : LOG_ICMP_ECHO
Class-map: ICMP_ECHO_STRING_AAAA (match-all)
5 packets, 670 bytes
5 minute offered rate 0 bps
Match: field ICMP type eq 8
Match: start ICMP payload-start offset 0 size 256 regex ".*[aA][aA][aA][aA].*"
logClass-map: class-default (match-any)
0 packets, 0 bytes
5 minute offered rate 0 bps, drop rate 0 bps
Match: anyClass-map: class-default (match-any)
0 packets, 0 bytes
5 minute offered rate 0 bps, drop rate 0 bps
Match: any
A quick final notice on use the logging statement with the access-control policy-maps. The rate-limiting mechanism for those is the same as used for the access-lists, and configured using the commands ip access-list log-update|logging.
Further Reading:
Flexible Packet Matching
FPM Deployment Guide
PS
The configuration in this post have been implemented and tested using IOS 12.4(24)T on a 2811 ISR. You may encounter bugs and errant behavior in earlier IOS releases, and I suggest you always using the latest image for FPM implementation.
