GNS3 on Ubuntu
INE would like to thank Nadeem Rafi for this guest blog post on using GNS3 with Ubuntu! Nadeem is one of our prized CCIE 2.0 Self-Paced students currently studying hard for his CCIE R&S exam. You will often see Nadeem in the INE Online Community working with his fellow students. Nadeem is currently enjoying 100 rack rental tokens from Graded Labs for his excellent post here!
Installing and Dual Booting Ubuntu
Linux is a stable Operating System and applications that do intense calculations can be handled in a more optimized way, as compared to other proprietary Operating Systems. Perhaps one of the best things, however, is the fact that it is free and can co-exist with other Operating Systems.
Ubuntu is more user friendly than many other Linux flavors, especially considering that almost everything works out of the box with most laptop installations.
Ubuntu can be obtained in both 32-bit and 64-bit versions from:
http://www.ubuntu.com/GetUbuntu/download
For more information about how to install and dual boot with Windows XP (XP installed first), visit:
http://apcmag.com/how_to_dual_boot_windows_xp_and_linux_xp_installed_first.htm
For more information about how to install and dual boot with Windows Vista (Vista installed first), visit:
http://apcmag.com/how_to_dualboot_vista_with_linux_vista_installed_first.htm
After you have installed and booted Ubuntu successfully, you can proceed to the installation of GNS3 and the supporting software.
GNS3 and Supporting Software Installation
Installation of GNS3 is quite simple.
Step 1 - System - Administration - open the Synaptic Package Manager. You will be prompted for a password. Use your login password here.
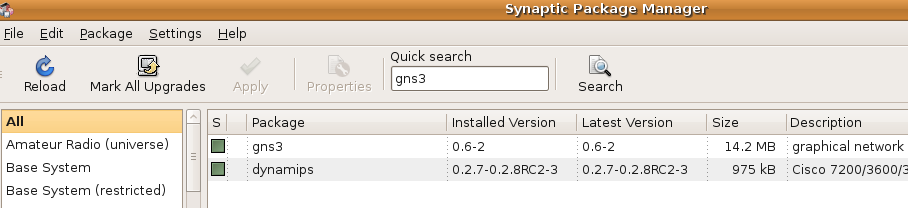
Step 2- In the search box, type gns3, which returns the GNS3 and Dynamips packages. Select both of the packages (mark for installation). In the pop up window it will show all of the dependencies which these two packages require. Click Mark for these as well. Click Apply and installation will start by downloading and configuring GNS3 + Dynamips along with all required applications.

Step 3 - After successful installation, you will see the following icon: Applications - Education - GNS3 Graphical Network Simulator.
Step 4 - For a multi tab console we need to install the utility called konsole. In the Synaptic Package Manager type konsole and install it as previously described.
For best results, it is now time to configure Ubuntu for ease of use with GNS3.
Configuring Ubuntu for GNS3
For best operation of GNS3, we will create some directories. This will help to have a managed hierarchy of folders and files. Note: file and folder names under Linux are case sensitive, so the best option is to use lowercase names in all situations.
Step 1 - Create one root context-enabled Explorer. Go to Applications - System Tools and right click File Browser. Select Add this launcher to desktop.
Step 2 - You will see a new shortcut on the desktop for the file browser. Right-click it and choose Properties. In the Properties box you will see a command similar to “nautilus --no-desktop --browser %U”, which we need to replace with “gksudo nautilus” (without quotes). Now whenever you launch this version of the file browser, it will launch in root context and anything opened within this browser will automatically operate in the root context.

Step 3 - Now we will create one more shortcut for GNS3; using the above method. The only difference will be the command line text “gksudo gns3”. This shortcut will help you to launch GNS3 in the root context.

Step 4 - Open explorer using your newly created shortcut (root context file browser). Click on File System and create one new folder named gns3 (all lowercase).

Step 5 - Inside the gns3 folder, create the following folders: images, projects, configs, ie, capture, and tmp.
- images will be used for storing images
- projects will be used for storing .net files
- ie will be the working directory for router temp files
- capture will used for capturing network traffic
- tmp will be used for temporary files created by GNS3
Configuring GNS3
Before we start configuring GNS3, you have to provide at least one IOS image, preferably in an unzipped format. Ensuring the image is unzipped will save time when your routers boot and they will not need to unzip each time they are launched.
Step 1 - GNS3 requires to be run by the root account (admin account), for that we have created a shortcut which launches GNS3 in the root context. Launch Gns3 using this shortcut.

Step 2 - For the time being, cancel the first dialog box, and click on Edit - IOS Images and Hypervisors and click on the IOS Images in the newly opened window. (I assume that you have already placed one IOS Image of your choice into the /gns3/images folder). Please navigate to that folder and select your image, platform, and model accordingly. If you have a good Idlepc value, you can place it here also along with the default RAN for this IOS image. Do not forget to click on the Default image for this platform.

Step 3 - Now click on the External Hypervisors tab. Provide the proper working directory here /gns3/tmp and hit save 6 times. It will create 6 instances of Hypervisor.

Step 4 - Now go to Edit - Preferences and in the newly opened window, click on General and then on the General Settings tab. Configure this window as shown in following image, and replace the terminal command with the following:
/usr/bin/konsole --profile "gb" --new-tab -p tabtitle=%d -e telnet %h %p >/dev/null 2>&1 &
NOTE: The blog software is truncating one of the two hyphens (-) before the keyword new in the above command.
NOTE: This modification is only required if you want to use konsole (multi tab terminal emulator), otherwise you can leave it as is.

Step 5 - Now click on Dynamips - Dynamips and configure this window per the following graphic:

Step 6 - After applying the above configuration, press Test. If everything succeeded, you will see "Dynamips successfully started”. If you want to capture and examine packets, click on Capture and provide the path to your capture directory: /gns3/capture (this directory was created earlier). You also need Wireshark for packet analysis.
Creating the First Project
Step 1 - Go to your /gns3/projects folder and create one file and rename it test.net. Right click it and chose “Open with”, then “Open with other application”. In the command line type gns3, and click open. NOTE: Next time you can open any .net file by double clicking it, (this is the way of handling .net files because of a bug in GNS3 for Linux).
Step 2 - From the node types area, drag two instances of a router 3700 to the middle of the workspace ( I used the 3700 image, if you have used any other supported image, then drag that platform). Connect the devices using the Connect tool and then run the topology using the Run button.

You are now ready to create your topologies and start emulating. Remember, you can save your topologies to your /gns3/projects directory for later usage.
Happy emulating everyone! :-)
