How I Passed the CCIE Data Center Lab Exam
This past Monday I passed the CCIE Data Center Lab Exam in San Jose CA, making me four time Cisco Certified Internetwork Expert (CCIE) #8593 in Routing & Switching, Service Provider, Security, and Data Center, as well as Cisco Certified Design Expert (CCDE) #20130013. This was my first - and thankfully last - attempt at the DC lab exam, and also my first experience in the San Jose CCIE Lab location. In this post I’m going to outline my preparation process for CCIE Data Center, as well as to talk about my experience with the actual day of the lab.

The Initial Commitment
When the new CCIE Data Center track was first announced last year, it was a no-brainer that I was going to pursue it. As I already had 15+ years of experience in Enterprise networking, with a large focus on campus LAN switching, IGP and BGP routing, plus some minor exposure to the Nexus platforms, I thought it would be a cinch. After all, Nexus is just a fancy Catalyst 6500, right? The major hurdle for the track however was not the technologies, but procuring the equipment. After debating back and forth for quite a while, Brian Dennis and I decided that INE would hold off on the company Ferraris, and instead invest in the equipment for CCIE Data Center. One of our deciding factors to invest in the track was the sheer volume of customers at our CCIE Candidate Party at Cisco Live 2012 that kept asking us all night long, “when are you guys going to do Nexus training!” As they say, ask and you shall receive… or was it if you build it, they will come?
Coincidentally, our initial build plans for DC started in early July 2012, which makes it almost one year to the day from when we committed to the track until when I finally had a chance to take the lab exam.

Originally I had planned to try to get the very first available slot for the DC lab exam, but as always life happened and a few things got in the way, such as the birth of my daughter, as well as a short pit stop along the way to pick up the Cisco Certified Design Expert (CCDE). Anyways, onto my preparation…
Once our equipment build was finalized, which by the way was the most grueling and complicated build of my 15+ year career, Mark Snow and I decided to implement a divide and conquer approach to the blueprint, where we would split the Nexus topics, I would take Storage, he would take Unified Computing System (UCS), and then we’d come back and meet in the middle. Nexus I assumed would be simple, since I had some experience using it as a basic 10GigE aggregation switch, but none of the advanced DC specific topics (e.g. vPC, FabricPath, OTV, FCoE, etc.) In hindsight, yes Nexus is just a glorified Cat6k, however there are caveats, caveats, and more caveats galore. Did I mention Nexus has a lot of caveats?
Recommended Reading or: How I Learned to Stop Worrying and Love the Documentation
Since a lot of the DC specific technologies are so new, there’s not many traditional books that are out there that can help you, unlike something like OSPF that is over 20 years old. With Nexus the topics are so cutting edge, the NX-OS software team is literally pushing out hotfixes and new features as we speak. Therefore the only main resource that is available for reading about a lot of these technologies is the Cisco Documentation. I can already hear the collective groan from the audience about reading the documentation, but I can’t stress this enough, you must read the Nexus documentation if you are serious about these technologies and about passing the CCIE DC Lab Exam.

Personally the way I did this was to download every single configuration guide for Nexus 7K, 5K, and 2K in PDF format, and then load them on my iPad. Starting with Nexus 7K I worked from basic system administration up to interfaces, layer 2 switching, layer 3 routing, SAN switching, etc. Don’t count on having access to the PDF versions of the documentation in the actual lab exam, but for preparation purposes these are much more convenient than clicking through every section of the documentation in HTML format.

Note that for MDS you don’t need to read through as much, since the SAN switching syntax is essentially the same between the Nexus 7K, 5K, and MDS, as they all run NX-OS. The sections of MDS documentation that I did read end-to-end however are the Cisco MDS 9000 Family NX-OS Interfaces Configuration Guide and the Cisco MDS 9000 Family NX-OS IP Services Configuration Guide. Both of these sections are key, as some topics such as FC Trunking and Port Channeling work differently in MDS than they do in Nexus, and then the IP Storage features such as FCIP and iSCSI are unique to MDS and are not supported in Nexus.
Another key point about the documentation for Data Center, just like for other CCIE tracks and other technologies in general, is that once you know how to use the documentation and where things are located you don’t need to worry about the default values for features, or other inane details about syntax. For example there was a discussion recently on the CCIE DC Facebook group about how to create a mnemonic device (e.g. All People Seem To Need Data Processing / Please Do Not Throw Sausage Pizza Away) in order to remember in which features higher values are better and in which features lower values are better, e.g. LACP system-priority, vPC role priority, FabricPath root tree priority, etc. I responded, who cares? Why waste time remembering default values that likely will change between versions anyways? Instead, your time would be better spent making sure that you know the manual navigation path for all features that you will be tested on in the exam.

Another point to consider is that in the actual Lab Exam, access to the documentation web pages is not very fast. I’m assuming this is due to the strict content filtering that all the pages have to go through before they show up on your desktop. Regardless as to the reason, if you need to use the documentation in the exam and you don’t already know exactly where the page you want is located, you’re gonna have a bad time.
Additionally, don’t limit your reading of the documentation to just the configuration guides. There are a number of other very useful portions of the documentation that you should read – again, end-to-end, there are no shortcuts here – such as the white papers, design guides, and troubleshooting guides.

This is especially true since some of the verification and troubleshooting syntax for Nexus is just out of this world. I swear whoever works on the actual syntax parser for the NX-OS software team must get paid based on the number of characters that the commands contain. Did you say that your Fibre Channel over Ethernet isn’t working to your Nexus 2232PP Fabric Extenders that have multiple parent Nexus 5548UP switches paired in Enhanced Virtual Port Channel? I hope you remember how to troubleshoot them with the command show system internal dcbx info interface ethernet 101/1/1! Err… how about we just know where to find it in the FCoE troubleshooting guide instead then.

The real point of using the documentation is as follows: you must understand, in detail, the design caveats and hardware caveats that the Nexus, MDS, and UCS platforms have as they relate to the DC technologies.

Recommended Books
Beyond the documentation, there are a select few regular books that I used during my studies. The vast majority of them are either available on the Safari Online site, or in the case of the IBM Redbooks, free in PDF form direct from IBM’s website. These books, in no particular order are:
- NX-OS and Cisco Nexus Switching: Next-Generation Data Center Architectures
- Cisco Storage Networking Cookbook
- Cisco Unified Computing System (UCS) (Data Center): A Complete Reference Guide to the Cisco Data Center Virtualization Server Architecture
- Storage Networks Explained: Basics and Application of Fibre Channel SAN, NAS, iSCSI, InfiniBand and FCoE
- IBM Redbooks - Introduction to Storage Area Networks and System Networking
Cisco Live 365
For those of you that have never heard of Cisco Live 365 before, you’re welcome. ;) This is where all the video recordings and PDFs of slide decks are from the different Cisco Live (i.e. Cisco Networkers) conventions that have occurred in the past few years, from multiple locations. A lot of these sessions are used to talk about the introduction of new products, e.g. the new Nexus 7700 that was just announced at Cisco Live 2013 Orlando, while others are technical deep-dives into topics. In the case of CCIE Data Center there are a lot of really good presentations that I would recommend looking at during your preparation. You don’t need to have physically attended Cisco Live in the past to get access, just sign up for an account for free and you can search all the content. The Data Center sessions generally start with “BRKDCT” (Breakout Data Center Technologies), so that’s a good place to start your search. Notable ones that I personally thought are worth looking at are in no particular order as follows:
- BRKDCT-2204 - Nexus 7000/5000/2000/1000v Deployment Case Studies
- BRKDCT-2237 - Versatile architecture of using Nexus 7000 with F1 and M-series I/O modules to deliver FEX, FabricPath edge and Multihop FCoE all at the same time
- BRKCRS-3145 - Troubleshooting Cisco Nexus 5000 / 2000 Series Switches
- BRKDCT-2048 - Deploying Virtual Port Channel in NXOS
- BRKCRS-3146 - Advanced VPC operation and troubleshooting
- BRKDCT-2081 - Cisco FabricPath Technology and Design
- BRKDCT-2202 - FabricPath Migration Use Case
- BRKDCT-1044 - FCoE for the IP Network Engineer
- BRKSAN-2047 - FCoE - Design, Operations and Management Best Practices
- BRKCOM-2002 - UCS Supported Storage Architectures and Best Practices with Storage
- BRKVIR-3013 - Deploying and Troubleshooting the Nexus 1000v virtual switch
- BRKRST-2930 - Implementing QoS with Nexus and NX-OS
- BRKCOM-2005 - UCS and Nexus Fabric and VM's - Extending FEX direct to VM's in UCS and Nexus 5500
- BRKCOM-2003 - UCS Networking - Deep Dive
INE’s Videos, Workbooks, & Classes
Now in my personal case, when I am learning a new technology, I know that I have truly absorbed and understood the topics when I can explain it to someone else in a clear and concise manner, hence my day job, author and instructor at INE. From the culmination of reading these books, reading the documentation, and testing essentially every feature that the platforms have to offer, Mark Snow and I developed INE’s Nexus, Storage, and UCS classes, as well as the associated workbook labs and the live Bootcamp classes for these technologies.
As I’ve done many write-ups before on these offerings, and without getting too much into a sales pitch, you can find more information here about INE’s CCIE Data Center Video Series, here about INE’s CCIE Data Center Workbook, here about our CCIE Data Center 10-Day Bootcamp, and here about our CCIE Data Center Rack Rentals. Note that we are currently adding more capacity to rack rentals and adding more Bootcamp classes to the schedule, both of which I’ll be posting separate announcements about shortly.
Read, Test, Rinse, and Repeat
While learning and developing the content for Data Center I followed the same methodology that Brian Dennis and I have been personally using and have been teaching for the past 10 years (yes, I can’t believe it’s been that long). This methodology is essentially a four step process of learning and testing incrementally. This is also the same methodology that has helped Brian Dennis obtain five CCIEs, and for me to obtain four CCIEs and the CCDE, so trust me when I say that it works.
The methodology is a basic four step process as follows:
- Gain a basic understanding of the technologies
- Gain basic hands-on experience to reinforce and expand your understanding
- Gain an expert level of understanding
- Gain an expert level of hands-on experience
It might seem self-explanatory that you need to start at the bottom and work your way up, i.e. A then B then C then D, however over the years we’ve seen so many CCIE candidates try to shortcut this process and try to go from A directly to D. Traditionally these are the candidates that end up taking the lab exam 5, 6, 7 times before passing, essentially trying to brute force their way through the lab. Believe it or not, we have had customers in the past that have attempted the CCIE Lab Exam in the same track 10 or more times before passing. Coincidentally, these are also usually the customers that don’t want to hear that they don’t know something or that their methodology is wrong. Go figure.

At least for me personally, obtaining a CCIE is more about the journey than it is the destination. I feel that I would have cheated myself coming out of the process without truly being an expert at the technologies covered, so I made sure to really take the time and be meticulous about going through everything.

The CCIE Data Center Written Exam
Before scheduling the Lab Exam, I of course had to tackle the necessary evil that is the CCIE Data Center Written Exam. In my opinion this exam should be renamed the “how many stupid facts can I memorize about the Nexus and UCS platforms exam.” I didn’t pass the DC written exam on my first attempt, or on my second attempt. I’m not going to say exactly how many times I took the the DC written exam, but let’s just say that it’s somewhere more than two and somewhere less than infinity, and that I likely have seen every question in the test pool multiple times.
For those of you have passed this exam on your first try, more power to you. With me on the other hand I try not to memorize any facts that I can quickly look up instead. While whoever wrote the CCIE DC Written Exam may think it's important that the UCS B420 M3 Blade Server has a Matrox G200e video controller with integrated 2D graphics core with hardware acceleration and supports all display resolutions up to 1920 x 1200 x 16 bpp resolution at 60 Hz with a 24-bit color depth for all resolutions less than 1600x1200 and up to 256 MB video memory, I do not, but I digress.
Scheduling the CCIE Data Center Lab Exam
One of the biggest hurdles in obtaining the CCIE DC that I had not initially planned for was the availability, or lack thereof, of lab dates open for scheduling. I’m not normally one to complain about this, because when I took the CCIE R&S Lab Exam back in January 2002 I believe that I scheduled the date somewhere around July of 2001. Back then it was the norm to have a 6 month wait for dates, so when you went to the lab you had better be really prepared for it, otherwise you had a long 6 months ahead of you afterwards trying to think of what you did wrong. With Data Center though, this was a completely different ballgame.
By the time I got around to being ready to schedule a date, there was literally not a single date open on the schedule for any location. Mark Snow had even scheduled a lab date in Brussels Belgium, and was going to fly from Los Angeles in order to take the lab because that was literally his only option. Luckily right around that time the CCIE Program added new dates on the schedule, and he was able to move his lab attempt to San Jose, where he ended up passing.
Anyways once these new dates were added to the schedule I knew that I had to act fast, or risk having to wait until 2015 (not really, but that’s what it felt like). Unfortunately the date that I took was only a week after Cisco Live 2013 Orlando, so I couldn’t help but feel while we were partying it up at the conference I should have been at home studying instead. Also I would have much preferred to go to RTP over San Jose, since RTP is much closer to Chicago and I’m much more familiar with the area. In hindsight SJC was probably a better choice anyways, since I have lots of friends in RTP which means there would have been more distractions.
Traveling To San Jose
I scheduled my exam purposely on a Monday, which meant that I could get to San Jose either Friday or Saturday and then leisurely spend the rest of the weekend doing some last minute review and relaxing in the hotel without any distractions. This is the first time I’ve done it this way, and if you have the option to this is the approach that I would recommend.
Having had all my attempts in RTP in the past I was never worried about travel time, since it’s only about two hours from Chicago. Normally I would fly in the day before the lab in the afternoon, and then immediately go to the airport after the exam to fly home. Worst case scenario I could drive from to Chicago to RTP, which I actually have done in the past. I remember one time when teaching a class at Cisco’s RTP office I left the campus at about 5:30 on a Friday, drove to RDU and parked my car, bought a ticket at the desk, and still had time to make a 6:15 Southwest flight back to Chicago. I could only dream that Chicago O’Hare or Midway was as delay-free as RDU.
SJC on the other hand doesn’t have as many flights to Chicago, so I wanted to play it safe and arrive more than one day early. Luckily I did plan it this way, otherwise with the Asiana Flight 214 incident at SFO this past weekend I might not be writing this post at all right now; the moral or the story being that if you have the option to travel an extra day early before the exam, take that option.
For the hotel I stayed at the Hyatt Regency Santa Clara, which was nice. They have a nice outdoor pool area that I spent some time relaxing with my laptop at. It’s fairly close to the Cisco campus, being about a 5 – 10 minute cab ride to the office in the morning, and then after the lab I walked back to the hotel which took about a half an hour or so. If you’re familiar with the area it’s directly next to the Techmart and the Santa Clara Convention Center.
The Day of the Lab
San Jose’s lab starts at 8:15am, so I scheduled a cab from the hotel at 7:20am. I figured this way even if the cab didn’t show up I’d still have time to walk over to the office. Admittedly I did arrive much too early to the office, but it’s always better to be early than late. If you’ve ever had a class with Brian Dennis you’ve probably heard the same joke he’s been telling for the last 10 years: “I’ve been both early for the CCIE Lab Exam and I’ve been late for the CCIE Lab Exam. The preferred method is to be early.”
Since it was only about 7:30am when I got there I walked around the campus for a while just to try to calm my nerves. Ultimately I checked in with the receptionist, and made some small talk with some of the other candidates. I was hoping to go incognito for the day, but immediately the first guy I said hi to said “aren’t you Brian McGahan from INE?” Oh well… that's the price of being nerd famous.
The proctor Tong Ma came out to the lobby around 8:15am or so to collect us all and check IDs, and then did his spiel about the logistics of the lab location (e.g. where the bathroom was, the breakroom, lunch time, etc.). 8:30am was our official start time, so I sharpened my colored pencils, sat down at my terminal, logged in, and prepared for the fun.
Immediately all around me I heard the other candidates furiously pounding away on their keyboards. This is what I like to call the “panic approach”. I on the other hand started with a different approach that had already worked for me three times in the past. I took my first sheet of scratch paper, and started a quick drawing of the diagram I was presented with. This was my first lab attempt using the new lab delivery system where everything is electronic, but regardless in past attempts you couldn’t draw on their diagrams anyways.
One point of drawing out the diagram for myself was to help me learn the topology, but more importantly so that I could take quick notes as to which technologies would need to be configured in which portions of the network, e.g. which devices were running vPC, FabricPath, OTV, FCoE, etc.
The next step was to read through the exam, to see what technologies were actually being tested on, and to plan my order of attack on how I was going to build the network. One thing that I have found with my past CCIE tracks is that the order that they give you the questions in isn’t necessarily always the best order that you actually want to configure things. After all they’re only grading the result at the end of the day, not the actual steps that you used to get there.
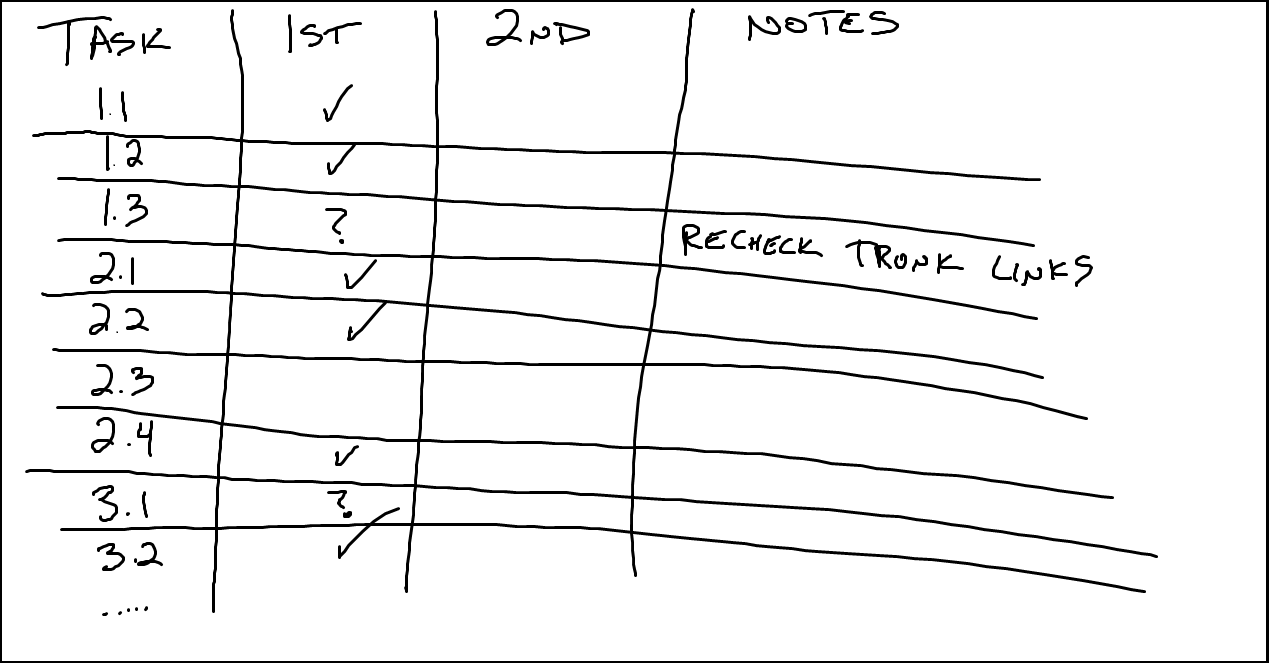
Once I had a basic understanding of what was covered, and had taken some notes on my diagram as to which features went where, I took my two other pieces of scratch paper (there were 3 total but you can always ask for more if you need), and drew out my two tables that I use to track my work. For those of you that have attended a live class with me in the past or watched any videos I’ve done on lab strategy you may be familiar with this, but for those of you that haven’t seen this there’s basically two tables that I use to track my work during the day. The first of which I use to track which sections that I have configured, how comfortable I am with the answer I gave, and which sections I skipped. Throughout the day this helps me to know what sections I need to go back to at a later time. Also at the end of the day this is the sheet I use to go back and check everything with a fine tooth comb. The end result looks something similar to the picture below, but this one is just something I made up now it’s not from any real lab.
![]()
The way I read this at the end of the day is that all the tasks with a Check mark I’m 100% confident that the solution is correct. Tasks with a ? mean that I configured something, but I’m not 100% if it’s correct or that I answered the question the way that they wanted. Anything that is blank, like section 2.3 that means that I completely skipped that task, and that I’ll come back to it at a later time. Once I’m done with all the tasks, I then circle back around to the tasks that I completely skipped to see if I can answer them, then revisit the ones with a ? that I wasn’t 100% sure about. Finally the “2nd” column is for my double checking, where I start all the way at the beginning of the lab and re-read each question, re-interpret it, verify my answer, and if satisfied check it off again and continue. In the case of the DC Lab Exam I ended up with two tasks with a question mark and one task with a blank at the end of the day. In other words by my count there was one task I definitely was getting wrong, two tasks I had completed but wasn’t sure if I interpreted properly exactly what they wanted, and all other tasks I was 100% confident were correct.
The second of these scratch paper tables was to track my timing. After all if they gave you a week to configure the lab, most candidates would probably pass. With the 8 hour time limit ticking down though, not so much. This is why it’s not only important to track your progress throughout the day to see which sections you’re confident about your answer, but also how long it’s taking you to configure them. The end result of this table looks something like this:
![]()
The “Time” column represents the hour of the day. The lab starts around 8 and ends around 5. Between 8am and 9am, I got zero points. The rest of the values in the table are made up, I don’t remember what the point values of the sections in my attempt were, but the first row is actually true. From 8:30am to 9am I did not configure a single section, and I did not gain a single point. Why? Because I spent that half hour drawing the topology, reading through the tasks, and planning my attack. While most people take the “panic approach” and immediately begin configuring the lab blind, I knew that even though it would cost me time up front to draw and read, it would save me time in the long run. This did actually save time in the long run, because I finished about 95% of the exam by 2:30pm, which gave me a very relaxed two and half hours at the end of the day to double, triple, and quadruple check my work.
Getting back to the table above, between 9am and 10am, I completed – and was confident with the answers of – sections that were worth 2, 2, 3, 2, 4, 2, and 2 points. Basically each time I completed a task and it had a check mark in the other table, I wrote the point value down here. Each time I completed a section I also checked the clock on the wall to make sure I was writing the point value in the correct row. The logic of using this table is simple: the exam is broken down into sections totaling 100 points. Excluding your lunch break, you get 8 hours to configure the lab. This means at an absolute minimum you need to be averaging 10 points per hour in order to hit your goal of 80 points. Now ultimately the totals on the right should be consistently be reading above 10 points for the early portion of the day, because you don’t want to configure exactly 80 points worth of sections with zero time left over at the end of the day to check your work. In this situation it’s very likely that you’re failing the exam. Instead you want to be consistently be hitting 14 points, 16 points, etc. especially early in the day, because then it makes you more relaxed that you’re not as rushed for time. Remember that in the CCIE Lab Exam your biggest enemy is stress – well other than simply not knowing the technologies, that’s kind of an issue too – so whatever you can do to help calm yourself down during the day, do it.
For me personally constantly tracking my timing is one of those methods that helps to relax me. When I hit about 1pm/2pm that day, I looked at my sheets that were tracking my work, sat back and said to myself “there’s no possible way you’re not passing this exam.” Now of course I didn’t really know for a fact that I was passing, ultimately only the score report can tell you that, but based on my point counts and how much time I had left to go back and double check I knew that I was golden. This brings us to my next point, which is that “golden moment”.
The Golden Moment
Every CCIE Track and its associated CCIE Lab Exam has what has been commonly referred to as the “golden moment”. This is basically the point in the exam that if you can reach, and you have everything working, your chances of passing are very high, i.e. you’re “golden”. In the case of CCIE R&S it’s having full IP reachability everywhere. In Security it’s when all your LAN to LAN and Remote Access VPNs work; in Service Provider it’s when you can ping between all your L2VPN and L3VPN sites; in Voice it’s when you can make all your phones ring, etc. In the case of CCIE Data Center, the golden moment is undoubtedly marked by one point: can you get your UCS blades to boot from the SAN.

The CCIE Data Center Lab Exam is very unique in my opinion based on the fact that essentially all tasks are cumulative and somehow interrelated in the exam. For example in the case of CCIE R&S, you could theoretically skip complete sections, such as IPv6, Multicast, QoS, etc. and still pass the exam, as long as you can gain enough points from all the other sections. For Data Center though, this is not the case. All tasks in the exam essentially are getting you to work towards the golden moment, which is to actually get your servers to boot their OS. All the technologies are so highly interrelated that the DC lab exam is a delicate house of cards. If one minor task is wrong, you’ve essentially bought yourself a $100 rack rental and a $1400 lunch for the day.
For example let’s take a theoretical CCIE DC lab scenario, and look at how the most minor of mistakes can snowball, and cause you to have a very bad day. Suppose we have two Data Center sites, “DC-A” and “DC-B”. In DC-A we have our UCS B series blade servers, while in DC-B we have our Fibre Channel SAN. Our ultimate goal is to get the blades in DC-A to boot from the SAN in DC-B. DC-A and DC-B have a Data Center Interconnect (DCI) provider between them that runs both IPv4 Unicast and IPv4 Multicast routing, and it’s up to us to configure everything so that it functions properly. On one our our edge Nexus 7Ks though we forgot to enable jumbo MTU on the link to the DCI. Minor problem, right? Wrong, we just failed the exam! But why?
The UCS blade server was trying to boot to the Fibre Channel SAN. Fibre Channel doesn’t natively run over the DCI though because it’s a routed IP network. To fix this we first sent the FC traffic to our MDS 9200 switches. The MDS switches in DC-A and DC-B then encapsulated the Fibre Channel into a Fibre Channel over IP (FCIP) tunnel between each other. Additionally the MDSes were in the same IP subnet and VLAN in both DC-A and DC-B, so their FCIP traffic had to go over an Overlay Transport Virtualization (OTV) tunnel across the DCI. The OTV tunnel was up and working. The FCIP tunnel was up and working. Both the UCS blade and the FC SAN successfully FLOGI’d into the Fibre Channel Fabric. All of our Fibre Channel Zoning was configured properly. The UCS blade server’s Service Profile associated properly. We clicked the “Boot Server” button, connected to the KVM console of the blade, crossed our fingers, and got this:

No! It didn’t boot the VMware ESXi instance! This means that our Nexus 1000v didn’t come up either! I just lost 22 points and failed the exam! Why did the CCIE Lab Exam Gods hate me!

Our OTV tunnel is actually Ethernet over MPLS over GRE over IP, or what is sometimes referred to as a Fancy GRE Tunnel. Our SAN traffic is SCSI over Fibre Channel over TCP over IP. FCIP frames can go up to about 2300 bytes in size, but our default Ethernet MTU was 1500 bytes. OTV doesn’t support fragmentation, and sets the DF bit in its header. This means that since we forgot to type the single command mtu 9216 on the edge switch connected to the DCI, our SCSI over Fibre Channel over TCP over IP over Ethernet over MPLS over GRE over IP was dropped, and we had to do the walk of shame out of building C in San Jose as we knew the CCIE Lab Exam had defeated us that day.
This of course is just one of a thousand different possible examples of how the house of cards that is the Data Center Lab Exam fits together, but you get the idea. Luckily for me however, when I clicked the “Boot Server” button in UCSM this week, the results were closer to the output below.

In Conclusion
For those of you still reading I hope that you found this post both helpful and informative. If you’re still on the fence about pursuing the CCIE Data Center Track I would definitely say that it’s worth it. If you told me 12 years ago when I got out of server support that I’d be back in the server support market today I’d never have believed it, but without throwing around too many buzzwords like public/private cloud etc. this Data Center space is clearly here to stay, and will only continue to grow. Especially with how rapidly the market has been changing within the past few years with virtualization and an entire plethora of new technologies and design philosophies, it’s more important than ever to try to differentiate your skill set in the market.
Thanks for all the well wishes, and good luck in your studies!
