Pentesting 101: Fingerprinting

So far in the introduction to penetration testing series of articles, we have covered non-intrusive ways of gathering intelligence on a target network. Using Technical and Human OSINT helped create a picture of the target network that is subject to a penetration test through unobtrusive means.
If you’re just joining us in this series, we define Technical OSINT as gathering technical data on a target network through tools and web searches. Human OSINT is gathering data on the human aspect of the target network. Aspects of an organization such as email addresses, exif data and relationships are all included in Human OSINT. Now that we are past those two stages, we can talk about fingerprinting the network.
Fingerprinting is part of initial recon of a target and a means of gathering a target network fingerprint is done through scanning. There are many types of scanning like network/port scanning, web scanning, service scanning, and vulnerability scanning. Much like with OSINT, no network is accessed without first fingerprinting the network from the outside. It is important to identify the types of systems and networks in the target network to select the tools needed for the penetration test. Fingerprinting greatly increases the chances of success in gaining access to the target network.
Scanning is done in many different ways and with many different tools. There are automated scanners that we will discuss in this series as well as purpose-built scanners which we will talk about in the next article. Overall though, scanning allows the user to probe a singular target or network to find out what devices may be listening.
Scanning can also find out what services might be listening on a specific port, the version of those running services, operating system information, and if a firewall is running. When a simple port scan reveals there are services running, a more detailed service scan must ensue. These service scans are more focused and probe deeper into the target.
The data these service scans provide is generally referred to as “the attack surface.” Examples of these more focused scans could be as follows; does the ftp server allow for anonymous login? Is the web server running WordPress with default credentials? This is not an inclusive list but just a couple of major items deeper scanning can bring to light.
There are times where scanning can provide a quick and easy way into the network through an unpatched operating system or service. That low hanging fruit, however, is becoming harder and harder to find. Yes, lazy admins still exist and there are unpatched servers on the internet from the early 2000s, but you should always assume your target has a baseline sophistication that precludes such simple errors.
While scanning is thought to occur only from the outside of a network, it also can happen within a network. We will discuss that concept later on when we talk about surveying and moving through the internal network. For the purposes of this article we will use nmap’s own server setup for scanning: scanme.nmap.org.
FINGERPRINTING AND SCANNING
When most people think of scanning, they nearly always think of nmap. Nmap is the go-to tool of choice when it comes to scanning a network or host. Nmap has over two decades of development and can do practically everything. Besides finding open ports and service information, nmap can also run scripts to extend its functionality to include things like DNS zone transfers and enumeration of web servers. Nmap is easily installed on every major operating system and also has a graphical user interface called Zenmap. This series will use nmap from the command line and will only scratch the surface of its capabilities.
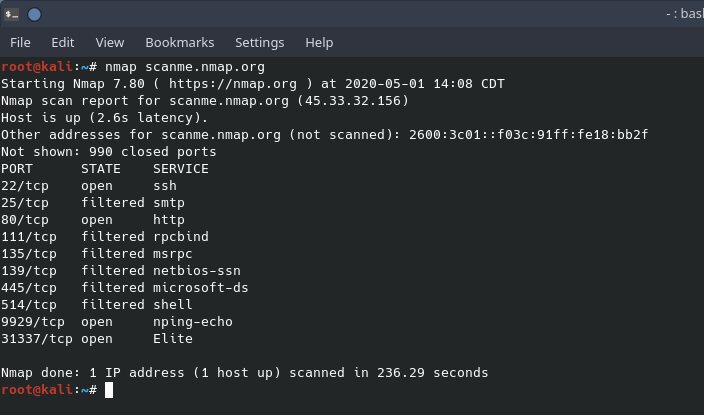
Nmap usage is very straight forward. One of the easiest ways to use it is just to invoke nmap with the target IP address, multiple addresses, network using CIDR notation or via a fully qualified domain name.

In the screenshot above you’ll notice that there were no command line switches invoked. With no command line arguments, the scan was a basic scan. Nmap used a TCP SYN packet to scan for the top 1000 commonly used ports. Nmap is also smart enough to scan ports in random order instead of progressive order. Also, notice that there are “open” and “filtered” ports. Open ports mean that there is something on the port listening while filtered means that there could be something there but nmap could not make a determination. Filtered ports could also mean that they are open for some IP addresses but block others.
During the remainder of the fingerprinting series, we will display nmap screenshots. We recommend reading the command line switches here to familiarize yourself with the information before the next section of the article is released. It’s worth it to take a moment to read the command line switches on this page to familiarize yourself with the upcoming set of screenshots.