Pentesting 101: Hiding While Fingerprinting

In the conclusion of the Fingerprinting section of our Pentesting 101 series we cover hiding while fingerprinting. Need to catch up? Check out our entire Pentesting 101 series here.
So far, the Fingerprinting section of our Pentesting 101 series has shown scans originating from a personal network. That isn’t always ideal in some situations. While following the attack methodologies found in the APT-1 report, Mandiant did not talk about APT-1 doing any type of scanning or fingerprinting. It would be crazy for APT-1 not to do any type of scanning. In fact, Mandiant probably had a hard time proving any type of scanning activity from APT-1. Being a nation state actor, APT-1 did not want to give away that it was scanning the target network from its infrastructure in China so it used a proxy to scan its targets. Below are two different ways to conduct network scanning via a third party. One is through a web service and the other through a SOCKS proxy via an open proxy and virtual private server (VPS).
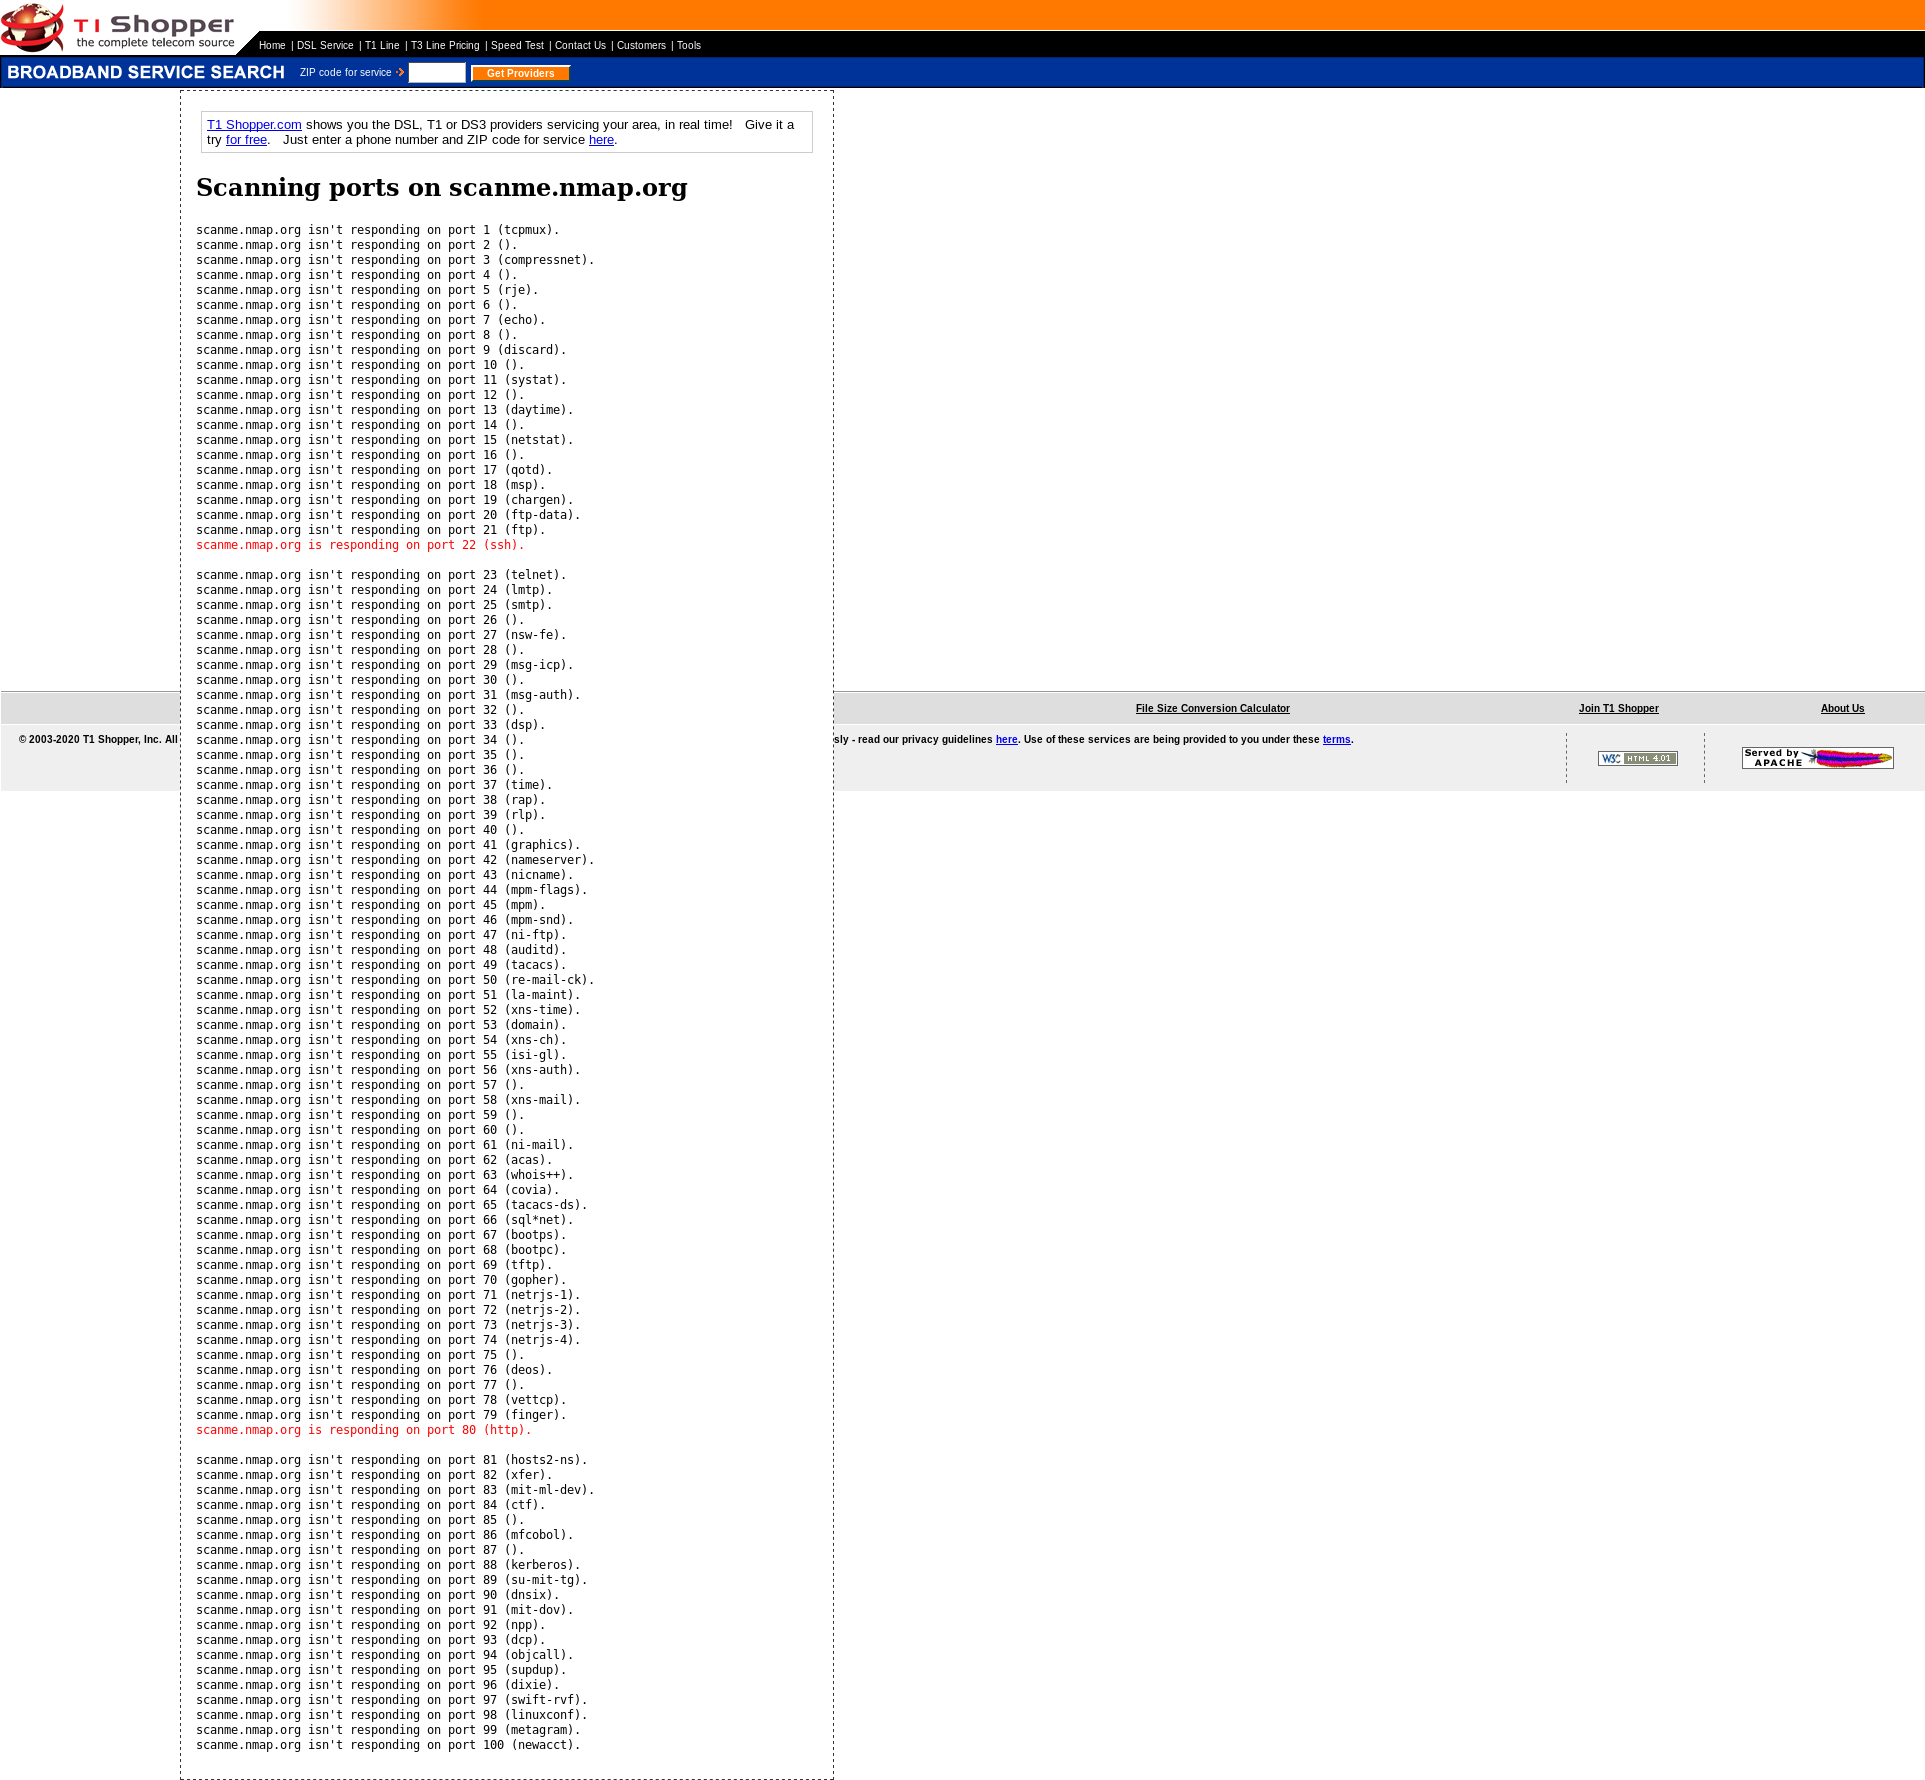
Using a website like “www.t1shopper.com/tools/port-scan/” can show you open ports on a target system but not much else. This online port scanner doesn’t even give banner information or offer any protocol options. The results are not nearly as granular as nmap. However, it provides a very rough estimate of open ports which you can point other scanning tools at. More importantly, it does save you from leaking your IP address to the target network.

Thankfully, there is another way of scanning a target from an IP address different from your own. SOCKS proxies have been around for decades and have aided people in being able to browse to websites blocked by their ISP or country. That same technology can be leveraged for scanning as well. There are two ways to employ a SOCKS proxy for scanning; one, where you have access to the proxy itself and another where the proxy is public and wide open for anyone to use. The latter proxy is generally deemed as less safe due to the threat of logging and sniffing of traffic. Public SOCKS proxies can be found with a simple Google search.

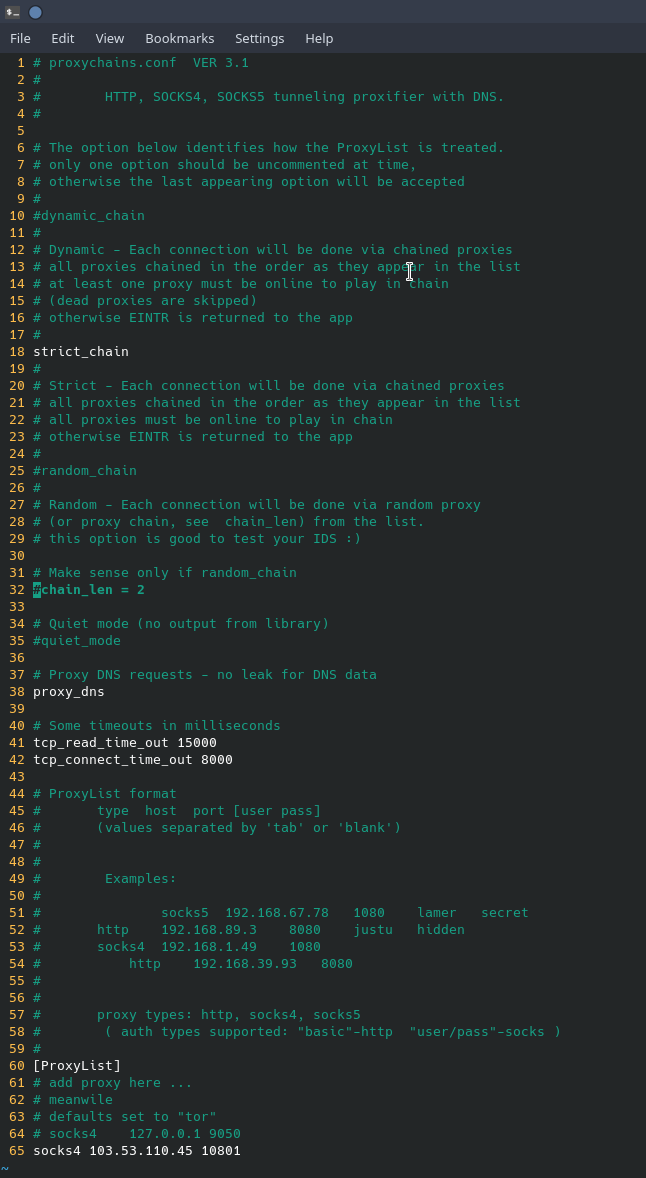
Scanning through a public SOCKS proxy is very straight forward. Once you have found a suitable SOCKS proxy, make sure that the program “proxychains” is installed. Once it is installed, edit the file “/etc/proxychains.conf” in your favorite editor and add the proxy information to the bottom of the file. A screenshot below is an example of what the configuration file looks like with a public SOCKS4 proxy configured.
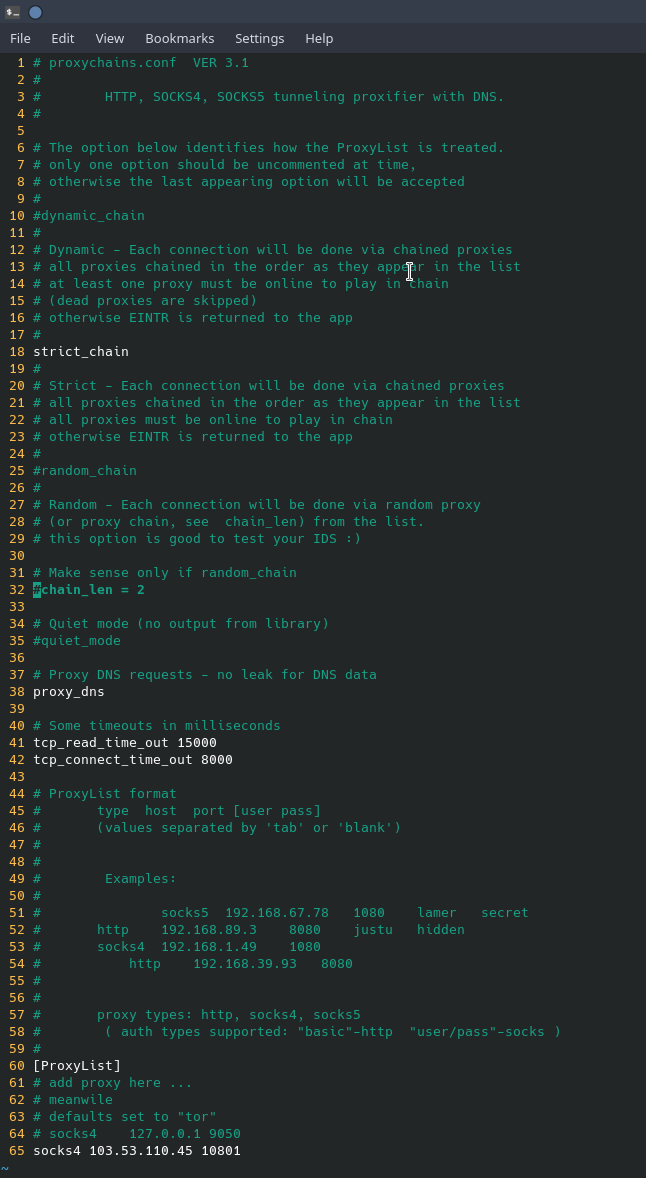
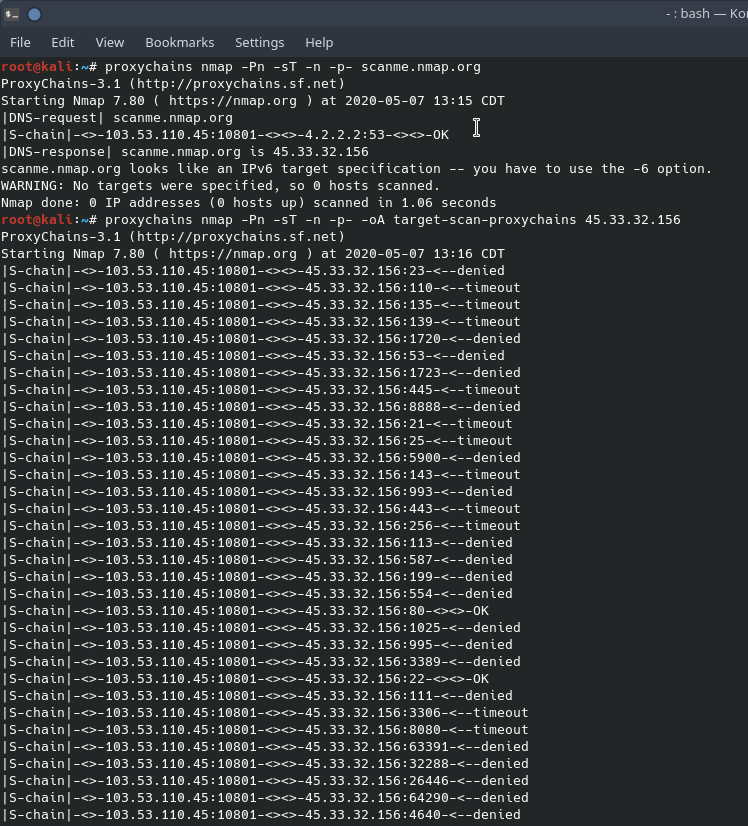
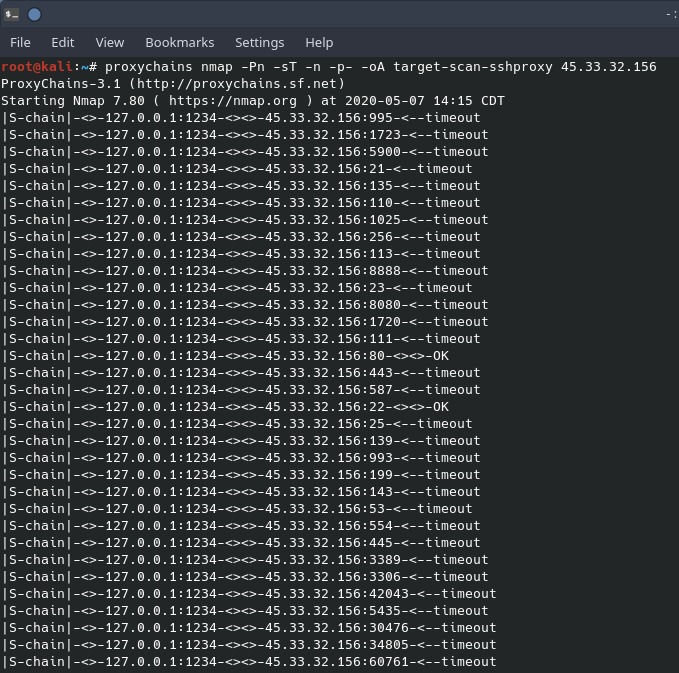
You’ll see that “proxy_dns” is not commented out, this helps to ensure that the DNS request you make will go through the proxy instead of through your normal DNS provider. However, though DNS technically works, conducting an nmap scan on a domain name through proxychains will not work. An nmap scan through proxychains must be done on the IP address of the target and not the fully qualified domain name. Also, because scanning through a SOCKS proxy works primarily on TCP, scanning with UDP cannot be done. To scan through a SOCKS proxy, nmap must be configured to only do a TCP Connect scan, TCP SYN scans will not work. Remembering that SOCKS proxies only carry TCP traffic, other protocols like UDP and ICMP cannot traverse the SOCKS proxy. This is important as DNS requests cannot be resolved, nmap domain resolution must be turned off. Below is a screenshot of an nmap scan on scanme.nmap.org (45.33.32.156) through a SOCKS proxy.
SOCKS proxies are good at hiding where you are coming from but they are not 100% secure when it comes to keeping your originating address private due to logging on the proxy itself. Also, some networks block proxies as well as TOR exit nodes by default as a security posture. Another way to scan a target network more securely is to scan it through a VPS. Setting up a VPS is a very simple task and can be done through various service providers. To setup a SOCKS proxy through a VPS can be done easily though a simple SSH command.
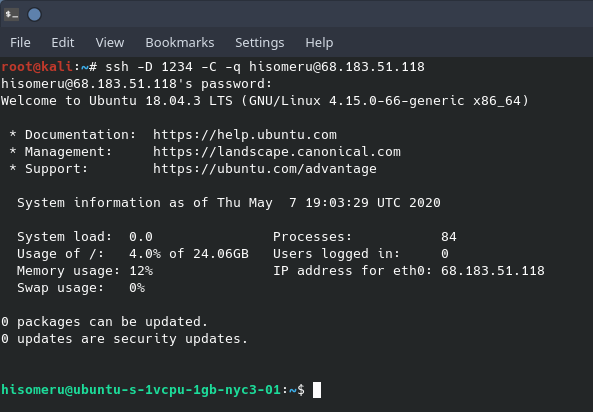
Above is the SOCKS proxy setup through SSH. The command line switch of “-D 1234” says to open up port 1234 on the local host (the kali workstation in my situation). Everything that goes to port 1234 on the localhost will go through the SSH connection, through the VPS and out to the internet. The command line switch of “-C” says to compress all traffic before it goes through the tunnel. And finally, “-q” just says not to show the SOCKS traffic on the screen. One big item to note is the difference of where the proxy traffic is sent in “/etc/proxychains.conf”. In the previous example of using a public SOCKS proxy, the traffic was pointed at the public SOCKS proxy. In the instance of using a VPS, all traffic will be routed through the open port of 1234 on the localhost and NOT at the VPS we are SSH’d into. Remember in tunneling, all traffic pointed at 127.0.0.1:1234 will go out to the internet through the VPS host. A word on tunneling: Tunneling is a very important skill to learn. We will discuss tunneling in greater detail later on in this series.
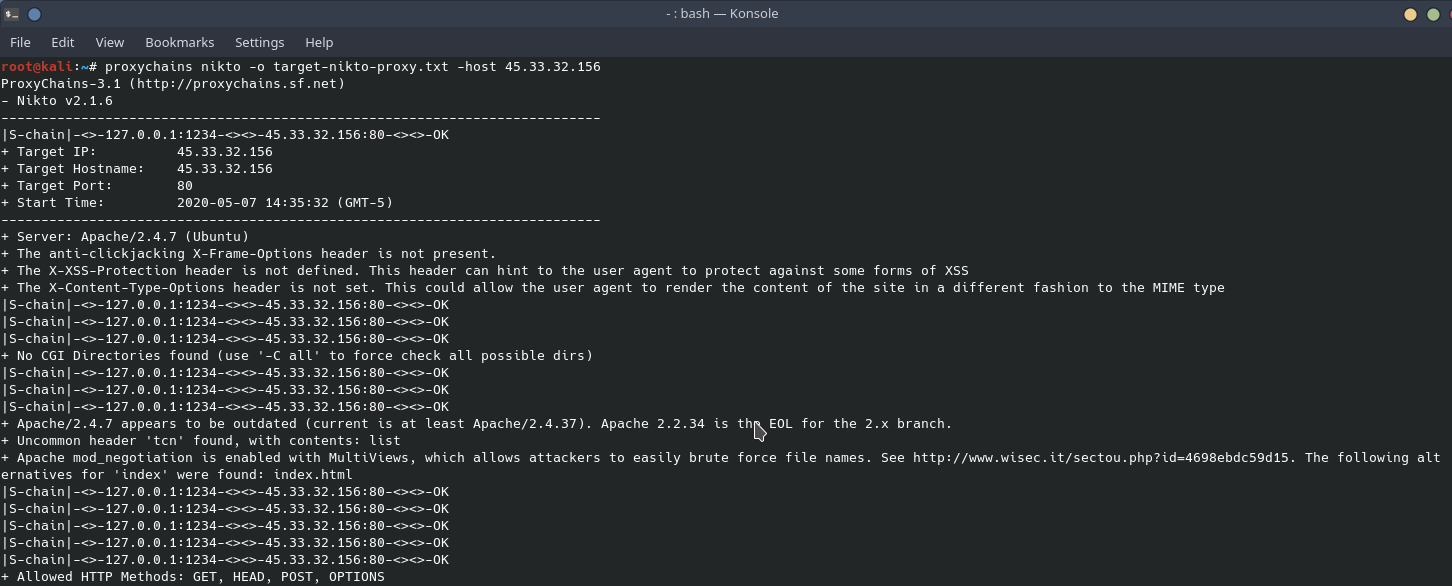
Scanning through a SOCKS proxy whether it is a public proxy or through a VPS is no different to setup than scanning using TOR as the SOCKS proxy. One final note on hiding, Nikto also allows the user to make changes to the nikto.conf file to change the User Agent string or change how scanning done as to not alert an IDS or IPS. Nmap strategies can also be changed as well using different flags. This is not the manual on hiding and evasion, knowing the tools you use is the key to success.
WHAT TO DO WITH THE FINGERPRINT
The goal of fingerprinting a network is to find out what operating systems and services are running and potentially find a way into the network through those internet facing systems. For those looking for ways into the network from an external source using vulnerable software, there is a search engine for service and operating system vulnerabilities called the “Exploit Database” or exploit-db. Exploit-db is updated daily and hosts exploit code and general information about vulnerabilities for a particular piece of software or operating system. Using the information, we found about the network services earlier, we can use exploit-db to search for an exploit. Remember, only use exploits against your home lab or networks you have permission.
CONCLUSION
The tools presented in this article are not the only tools that can scan and fingerprint a network. There are countless others out there. While some are simple and handle a small subset of services, there are others out there which offer whole suites of tools that cost money and try to be a one-stop-shop for fingerprinting, scanning, and vulnerability finding. Many of these tools can be run concurrently as well. If an nmap scan shows there is a web server present, run nikto, gobuster or other tools at the same time. There is an adage in the penetration testing community of “Always Be Enumerating”.
Fingerprinting a network may not always give you the way to accessing a target network. It is a start in creating that larger picture of the target and the systems they operate. These scans yielded a vast amount of network, service, and operating system knowledge that could not be found any other way but through scanning. Fingerprinting helps the penetration tester understand the security posture of the target network. You noticed that there was no easy way access the target network. There are other ways into the network besides technical means and we will discuss them shortly. In the next article we will take a small break from this series to talk about how to use python to craft your own unique port scanner as knowing programming can make you a much more skilled penetration tester.